
Taking Our Old Bathroom from Drab to Fab: A Four-Part Renovation Story—Part 4
Part 4: The Art of Transformation (Finishing)
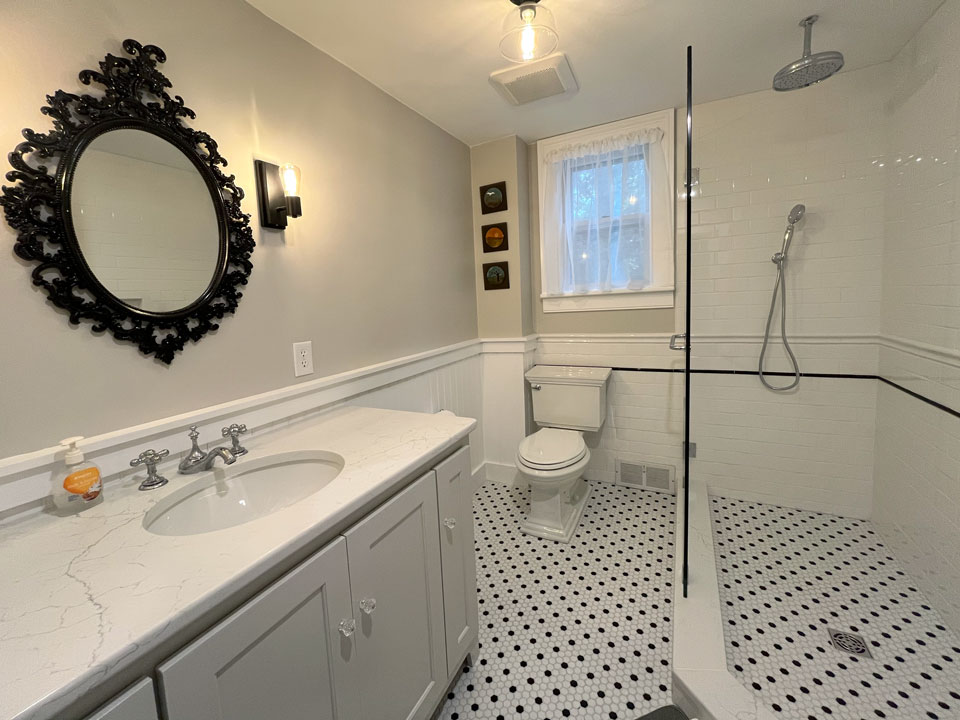
With the essential infrastructure expertly roughed in and the space meticulously prepared, the most gratifying phase began: Finishing. This is where the unseen efforts of planning, demolition, and rough-in finally converge into visible beauty, as new surfaces, custom cabinetry, and premium fixtures transform the space from mere bones to a truly elegant sanctuary.
We perceive the finishing phase as the exhilarating juncture where we transition from the arduous tasks of removing, repairing, and rebuilding to the rewarding process of installing items back into the space. This phase also encompasses our design and construction of the cabinetry. We would begin by laying the essential membranes for tile, insulating, and hanging the drywall. This would pave the way for the tile installation, the smoothing art of mud and tape, the assembly and installation of our custom cabinetry, the placement of electrical fixtures, countless fine details, and finally: the plumbing fixtures and trim.

Once the rough-in was completed, we began by laying a specialized tile membrane across the floor area, complemented by a foam shower floor system complete with its integrated drain (Schluter). These advanced modern membranes serve a crucial purpose: they separate the inherent flexibility of the wooden house structure from the rigid cement and ceramic tile, thereby significantly improving the longevity of the installation by allowing the house to naturally expand and contract without compromising the masonry layer. Each step within these projects mandates a cure time of 12-24 hours for the thinset used before it can be walked on or further worked. Our particular membrane required two precise seams, carefully sealed with a seam fabric and thinset, which also demanded its own 12-24 hour cure before tile could be laid upon it.
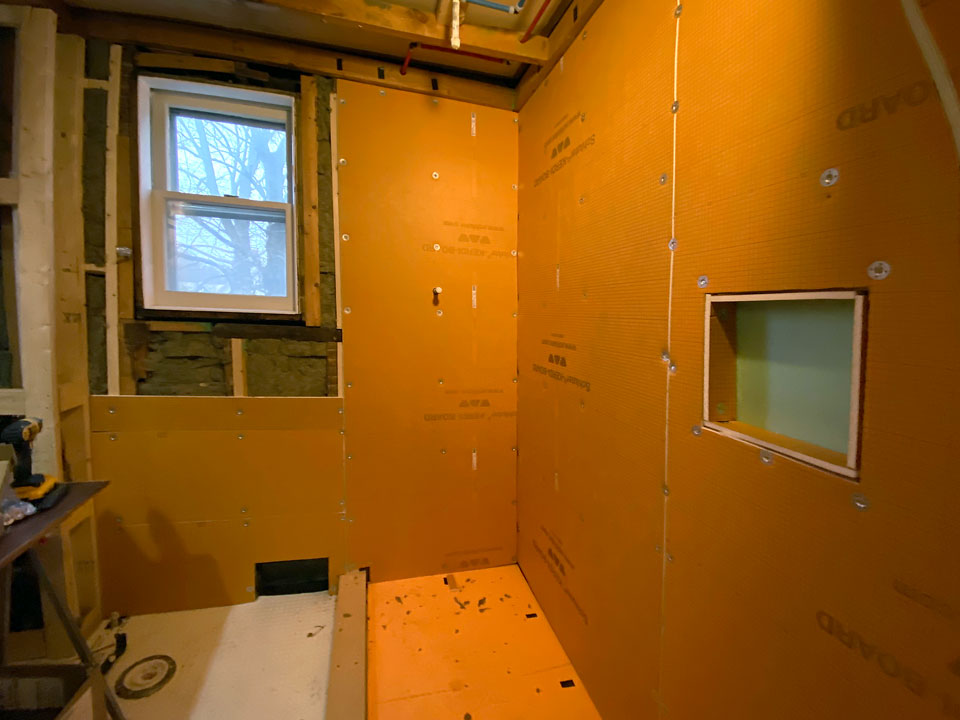
After the floor membrane was laid and its seams sealed, we commenced the process of installing the shower backing. Our initial step involved replacing the existing insulation with fresh Rockwool. This innovative insulation, ingeniously comprised of spun rock rather than fiberglass, offers a discernibly higher R-rating and, crucially, maintains its R-value even when exposed to moisture. While our new insulation boasts this impressive resilience to dampness, our robust waterproofing system is designed to provide comprehensive protection.
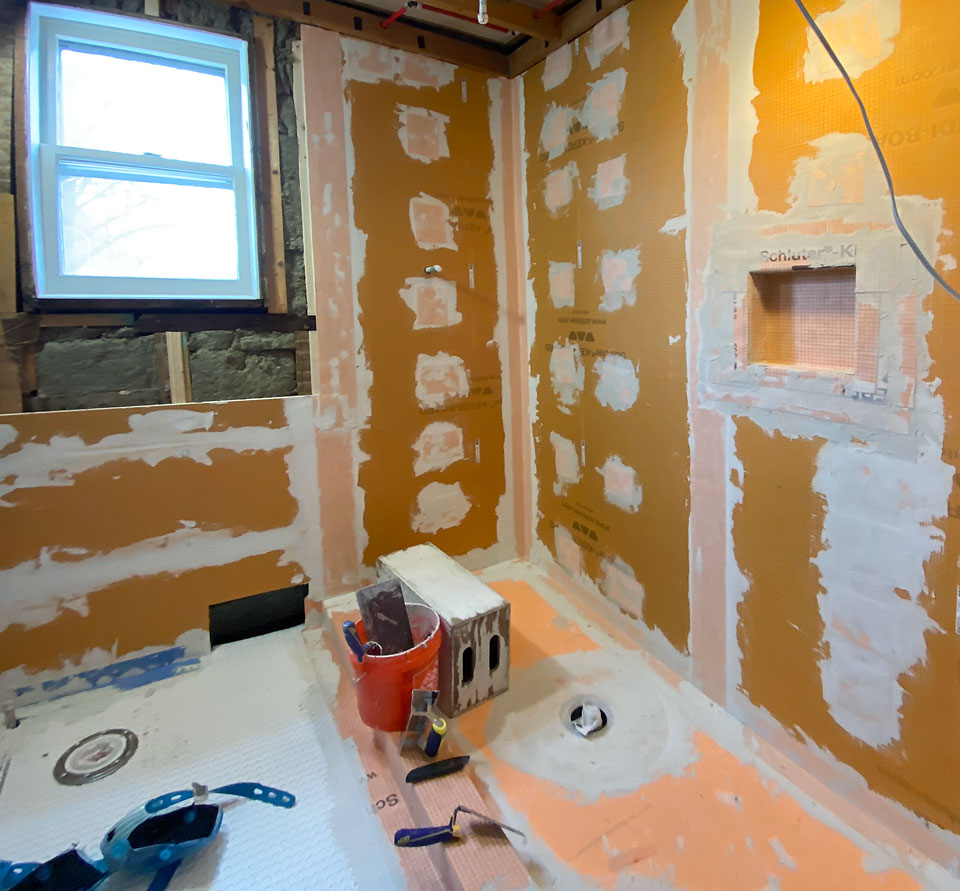
The system we employed incorporates foam tile backer boards, each pre-affixed with a waterproof membrane on its front surface. We further fortified these panels by sealing them with the identical waterproof tape and thinset previously utilized on the floor membrane. The system thoughtfully provides a diverse array of specialized corner pieces and gasket flanges, each designed to ensure a perfect, watertight seal at transitions, corners, around valves, the handheld wand, temperature control, and the diverter. Given our decision to use dimensional lumber for the shower curb, as opposed to the foam blocks provided with the system, we carefully wrapped the curb using a waterproof fabric and thinset, subsequently applying specific elements to seal the corners and transitions to the floor, the shower pan, and the adjacent walls.
These installations unfolded in harmonious synchronicity with the drywall we applied to the areas of the bathroom destined to remain untiled. This process, given its limited scope, proved refreshingly simple, covering only half of the walls in our compact bath.
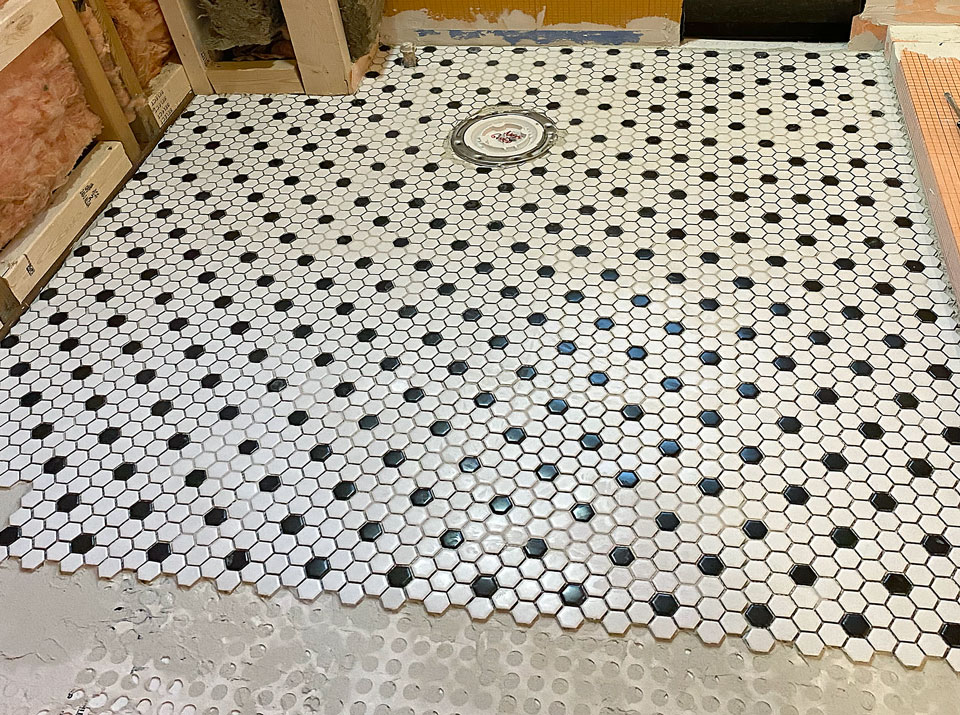
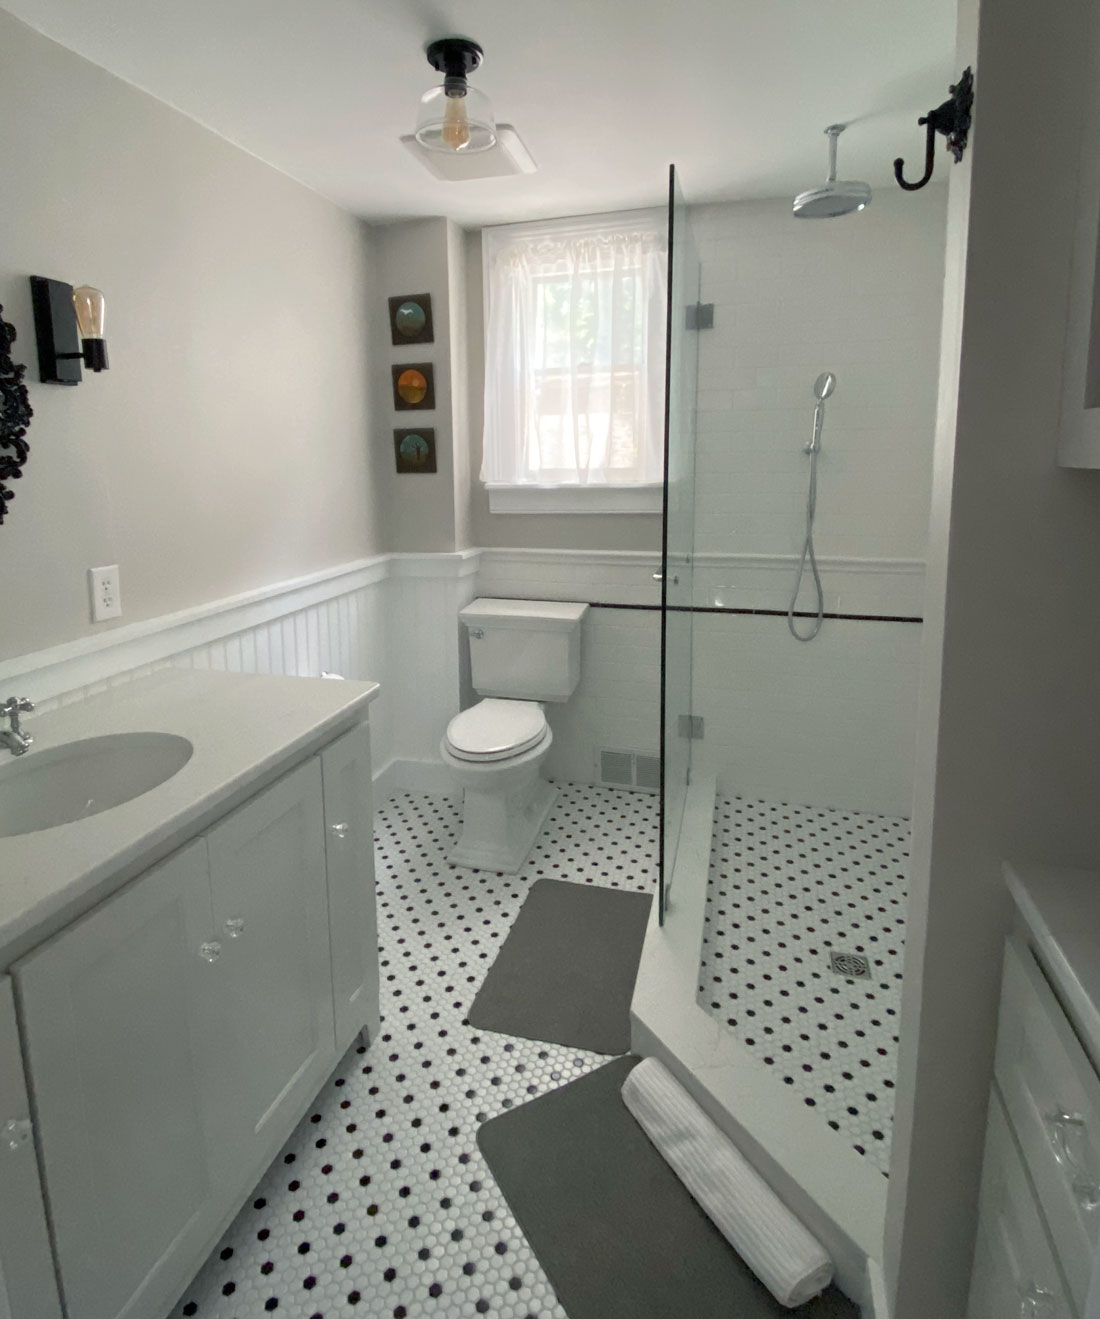
The Tile: The floor tile we chose is composed of delicate small hexagons, predominantly white, accented with strategically placed black tiles forming an elegant pattern. This particular style represents a very common and beloved choice for floors in older bathrooms and kitchens. Laying such small tiles, however, presents its own unique set of difficulties. The conventional guideline for thinset depth typically recommends a 3/8-inch deep notched trowel, but with smaller tiles, the thinset has a tendency to squeeze through the gaps, necessitating subsequent scraping and cleaning. Through experience, we discovered that 3/16 to 1/4-inch notched trowels were significantly more effective for these diminutive tiles. Our membrane thoughtfully featured a texture of round, Lego-like knobs, which serendipitously helped to maintain the overall depth of the thinset closer to our target of 3/8 inch deep, even with the use of smaller notches
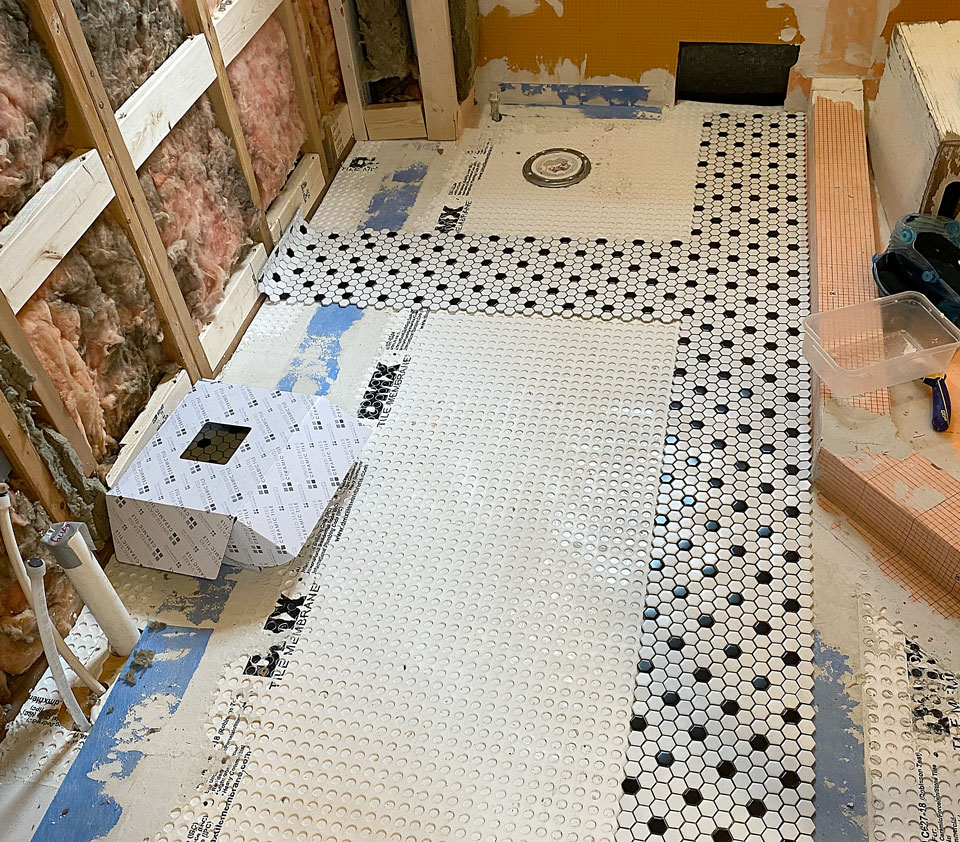

As is always prudent with something as enduring as tile, we first dry-laid the entire floor tile pattern, meticulously marking and cutting around the various fixed elements. Once all the dry-set tiles were carefully pulled back, we applied the thinset in manageable, controlled patches, working systematically from the furthest areas toward the doorway. The actual application proved fairly straightforward, as we had already precisely cut around obstacles such as the toilet flange, certain water lines, the shower drain, and around corners. Following installation, we observed a strict 12-hour waiting period before grouting (our specific thinset recommended 12 hours to cure before grouting; it's crucial to always check the product you are using, as these cure times vary based on the type and purpose of the mortar).
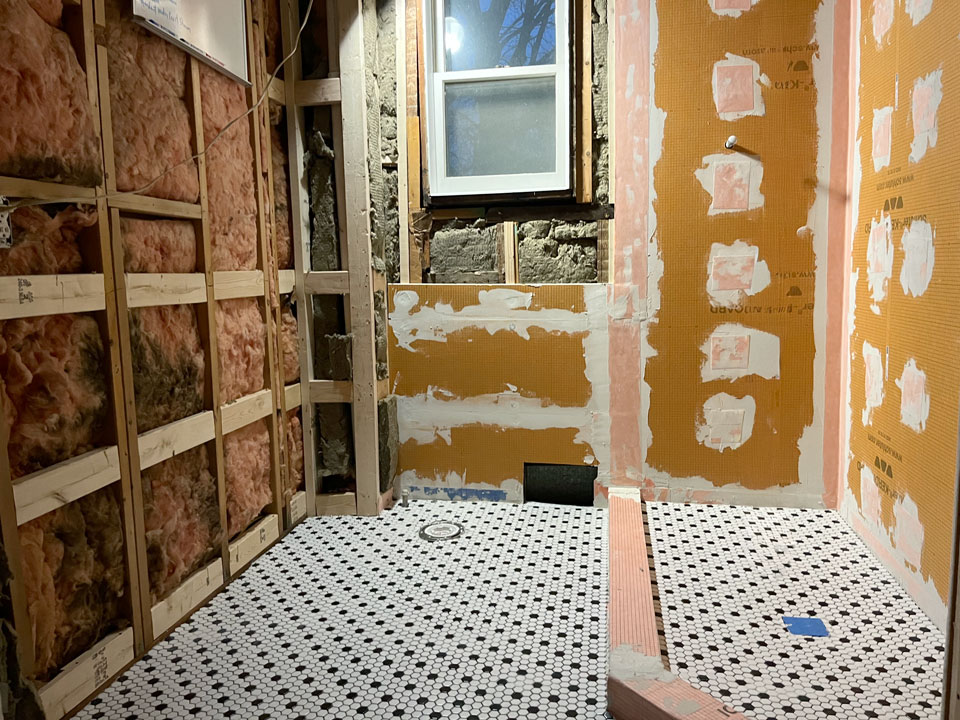
Grouting the floors was a refreshingly straightforward process. First, we carefully applied the grout to the floor, then allowed the prescribed time to elapse before wiping off the excess. Our specific grout mandated a two-hour cure time before the final cleanup and a three-hour window before foot traffic was permitted. Given the time it took to systematically apply the grout, our starting point was ideally ready for wiping down directly upon completion of the application. We exercised deliberate slowness throughout this process to ensure each area received the proper, undisturbed cure time.
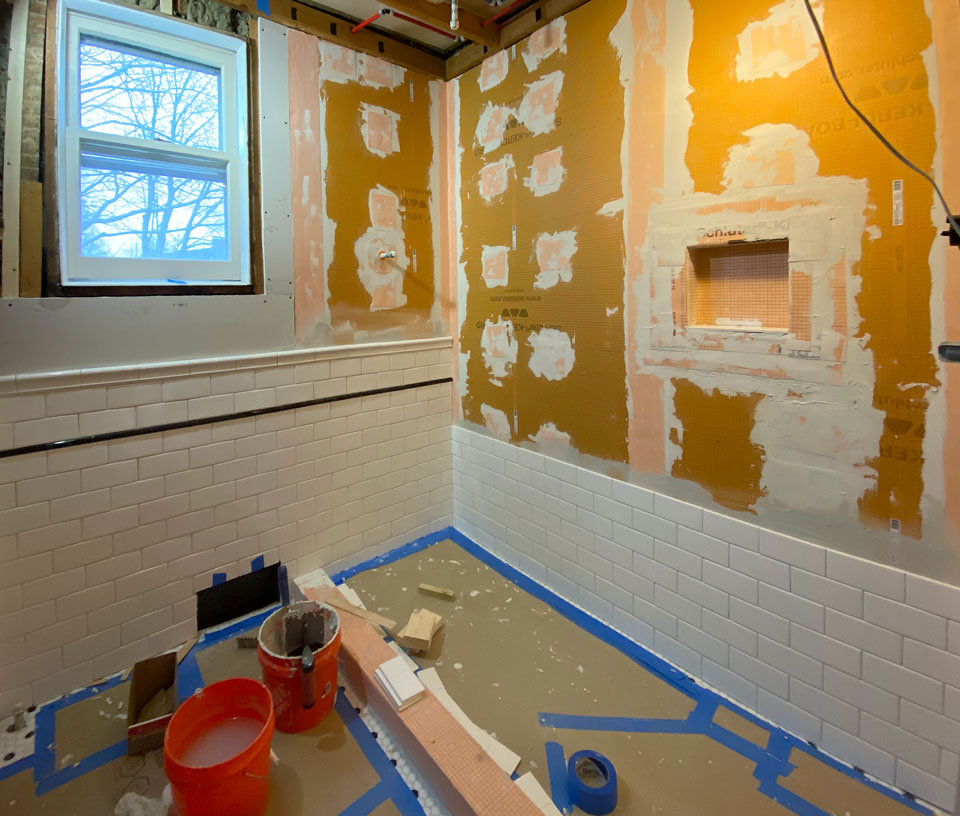
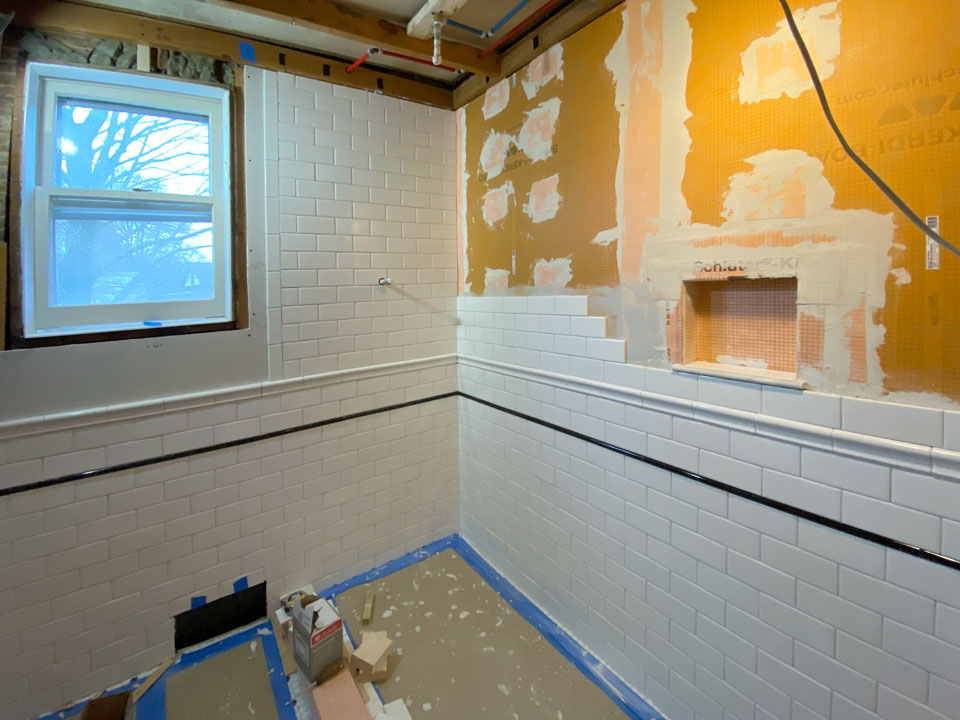

Once the floor and shower basin were finished, we turned our attention to the walls and shower surround that would receive the tile. Our primary concern with these vertical sections was establishing a perfectly level, even starting point. We judiciously decided to utilize the back wall of our bathroom to set full tiles, then meticulously cut down the perimeter tiles around the shower basin to precisely match the top of our starting tiles. This meant carefully trimming nearly two inches off the height of some tiles at the highest point of the shower basin, and adjusting to almost full tiles near the drain. Once the initial row of subway tiles was securely in place, the rest of the installation proceeded with remarkable ease. We relied on a laser level to maintain flawless alignment as we added ten consistent rows of 3x6 tiles. The elegant black pencil tile followed, succeeded by two more rows of 3x6. This precise point marked the installation of the bullnose, which elegantly defined the wainscoting's height. Along the back wall, the tiling gracefully concluded, but within the shower, the tile continued upward, ultimately reaching the ceiling. Along the tiled side edge, we incorporated a two-inch tapered edge tile, serving as a subtle yet effective trim element. The final grout application completed this essential facet of the project.
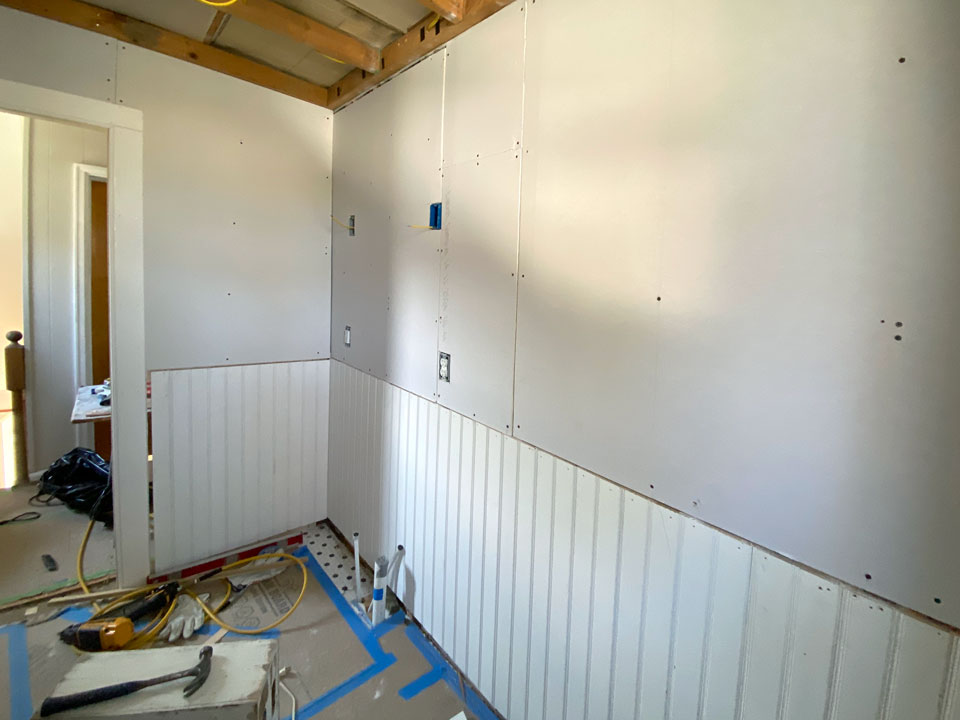
Our subsequent project involved the taping and joint compound application for the drywall, a process that is, fundamentally, quite straightforward. Akin to the thinset, each of the three distinct steps demanded a full day to thoroughly dry. Our initial coat and tape were applied with a smaller knife, diligently sealing all seams and wider gaps with tape to yield a smooth finished surface. The subsequent two coats were applied with larger knives each time, with the aim of achieving the smoothest possible finish. After the third layer had completely dried, we sanded, primed (we unequivocally recommend a high-quality primer to seal the compound, as it absorbs paint more rapidly than the drywall's paper surface, thereby eliminating the need for extra coats), and then painted the walls and ceiling.
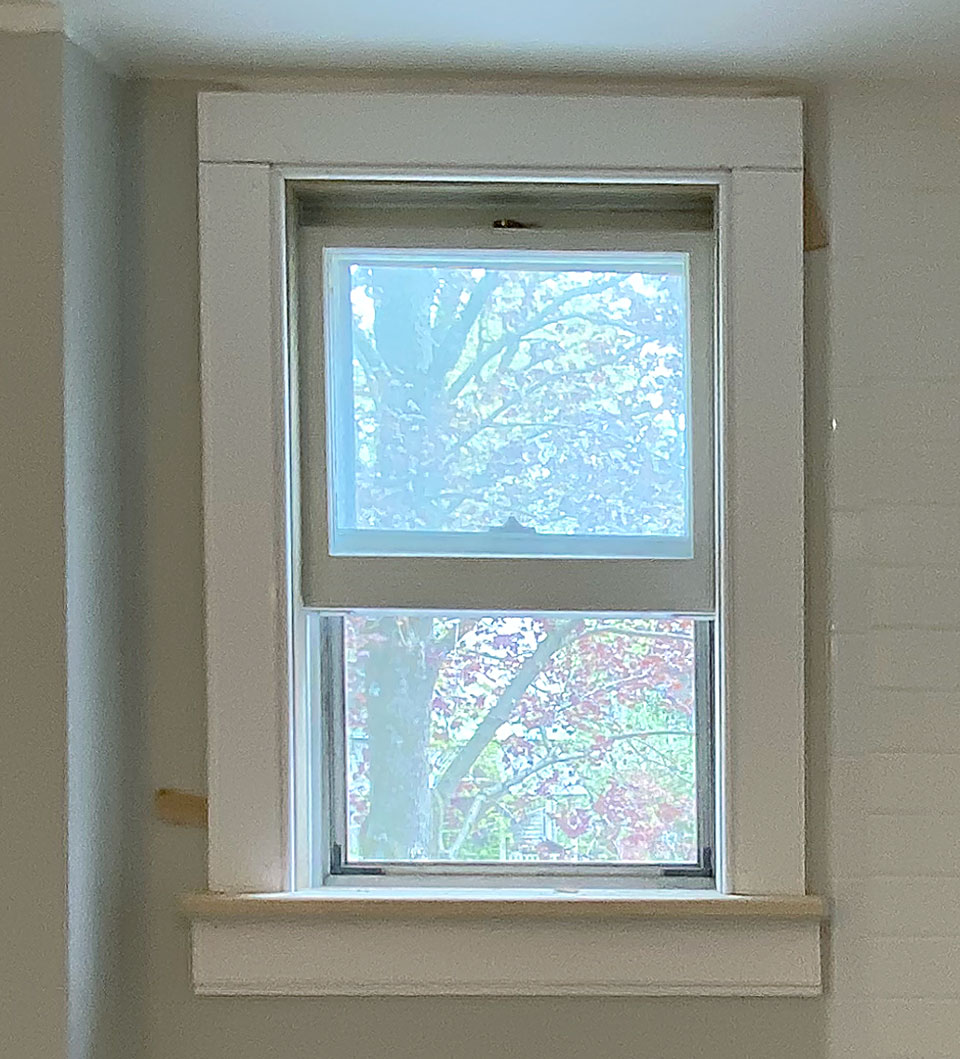

Following this, our attention turned to the bathroom window. The existing window would remain, but its original installation had, at some point, been incorrectly renovated. This structural issue would be repaired before we proceeded with the trim. Likely during the 1959 renovation, the window stops had been replaced with molding. While this worked adequately with the style of the old bath, it would fundamentally clash with the more classic molding we intended to install. Installing the new molding proved to be quite straightforward, and we promptly followed by trimming the inside of the door.
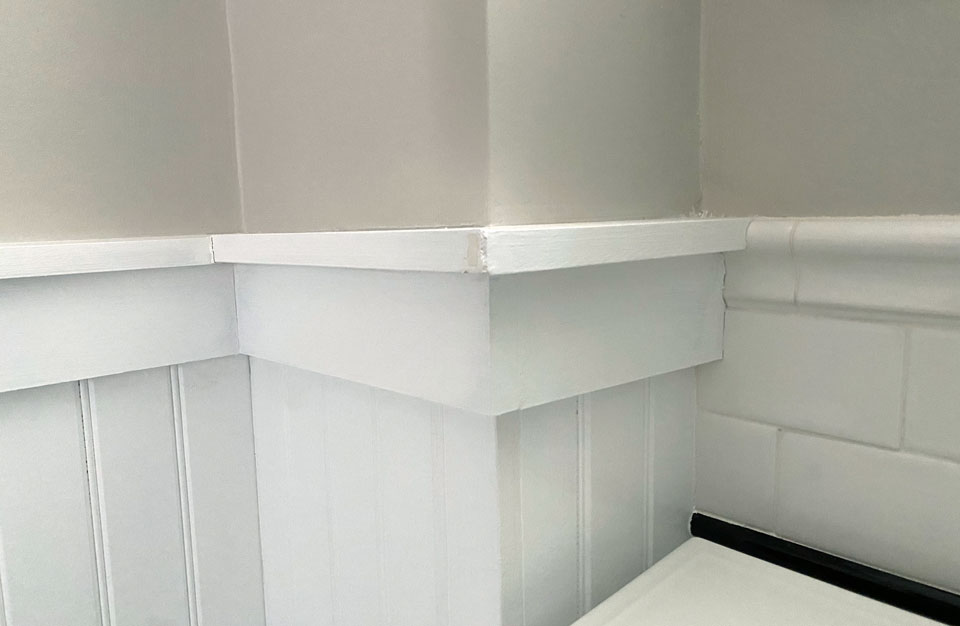
Wainscoting was the next logical step. With the tile already in place, we could align our wainscoting's top directly to it. The body of the wainscoting was crafted from standard two and three-quarter inch center bead tongue and groove boards. Since we were painting the boards, we opted for primed, finger-jointed wood. This material offers superior stability compared to standard solid wood, and is significantly less prone to warping or cupping from moisture. Our new/old-inspired trim details for the second floor called for a simple five-inch high baseboard, elegantly capped with a three-inch wide top trim, and crowned by a scribed top rail averaging two inches wide to provide a roughly half-inch front reveal.
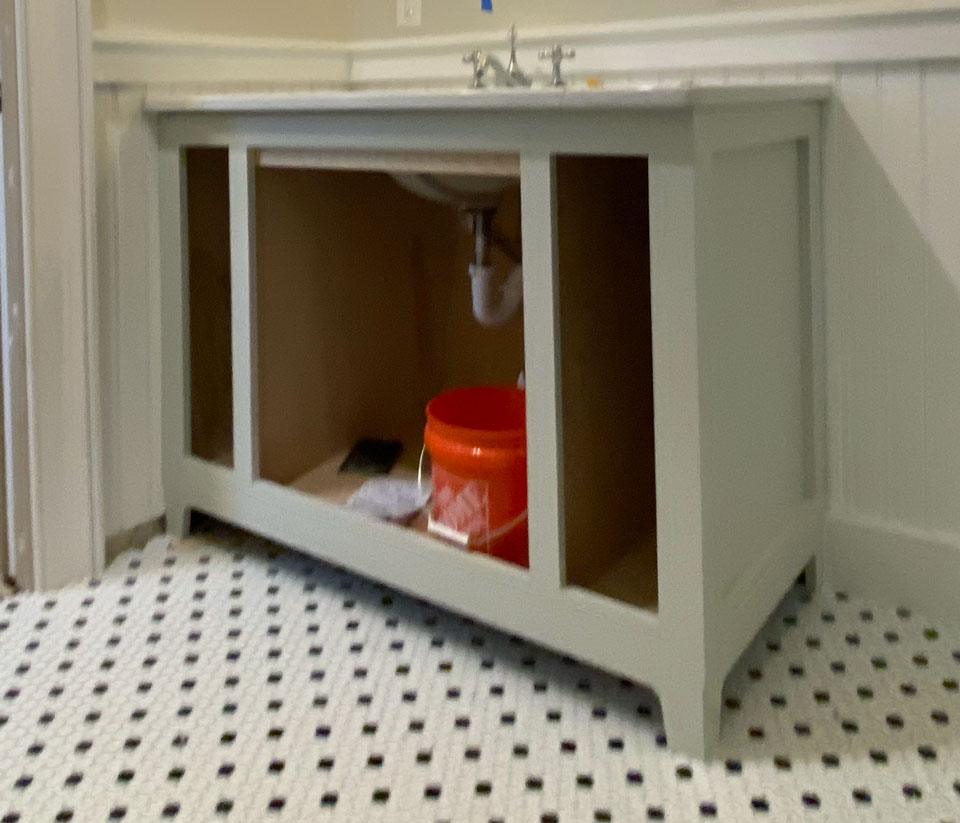
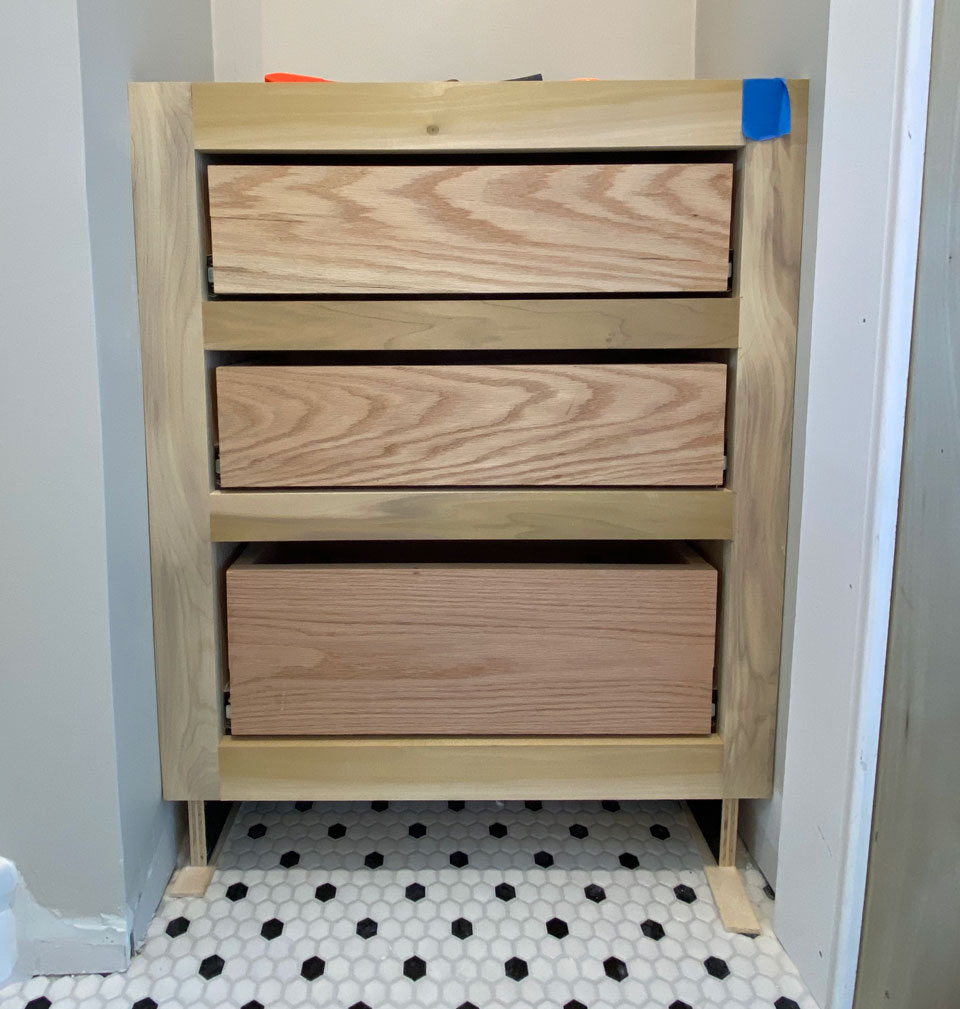
Our vanity, along with the upper and lower cabinets, was meticulously designed around the available space, aiming to maximize the feeling of spaciousness upon entering the bathroom. We chose to assemble the cabinets directly within the space, a decision necessitated by the tight quarters of our old house, especially after the—pocket door—wall had been enclosed. We strategically deferred the installation of the cabinet doors until the very end of the project, a choice that greatly simplified the final plumbing work.

To thoughtfully replace the original, conspicuously massive closet, we opted for two distinct cabinets. The lower cabinet features three drawers, carefully crafted with dovetail-jointed oak and attached drawer fronts, while the upper cabinet offers two to three adjustable, open shelves. We placed a counter atop the lower cabinet, one that not only matched the exquisite stone of the vanity but also mirrored its height, creating a seamless visual flow.
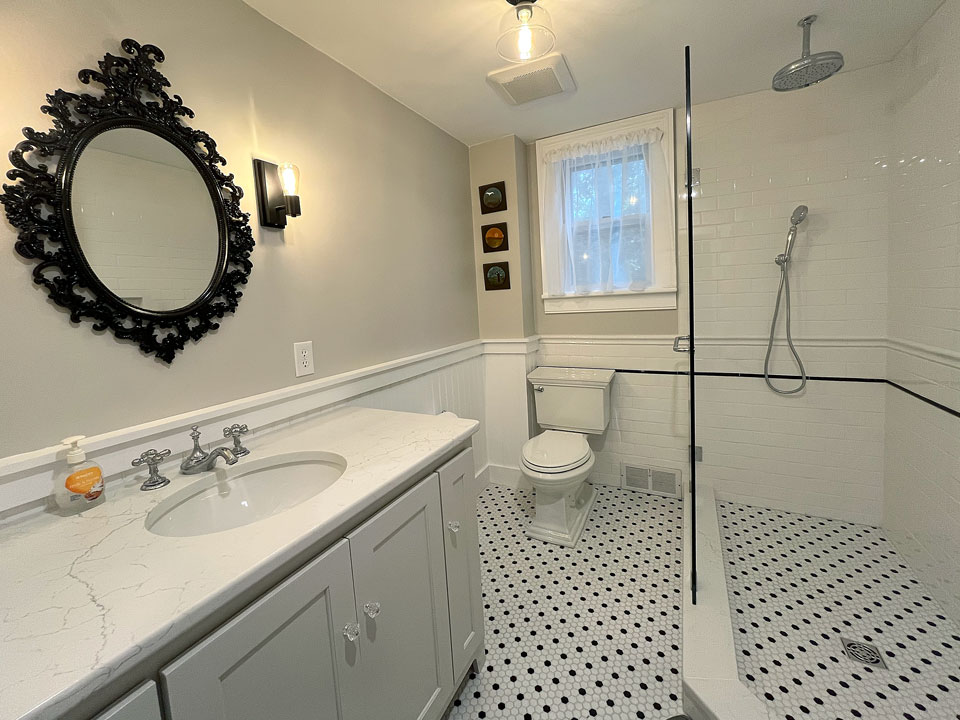
View from door
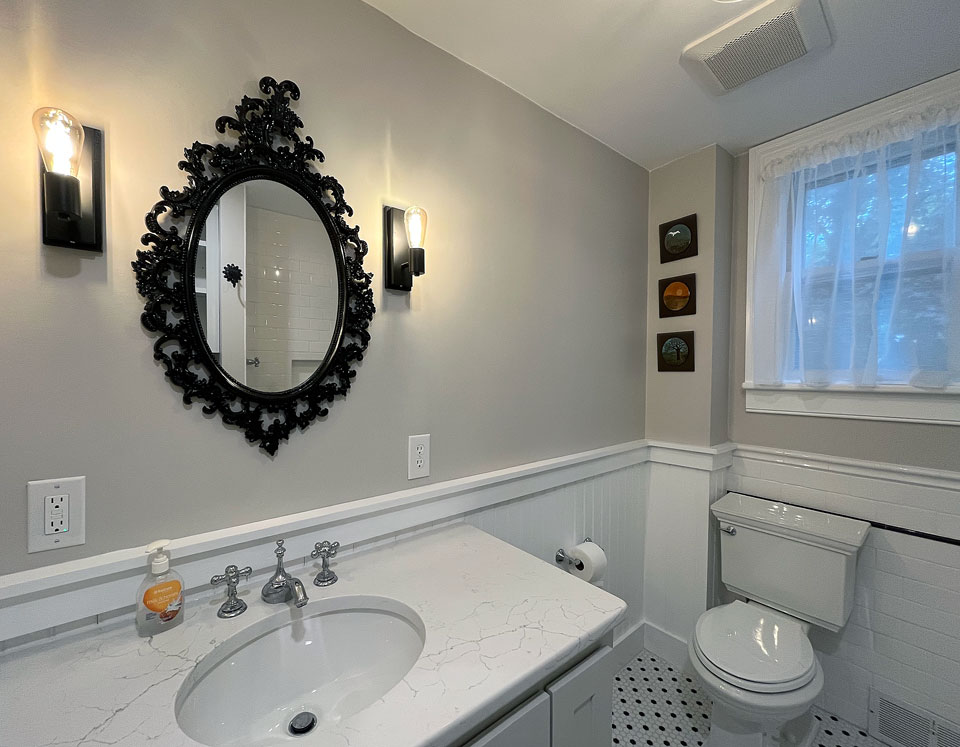
Vanity sink detail

View towards door

Cabinet detail
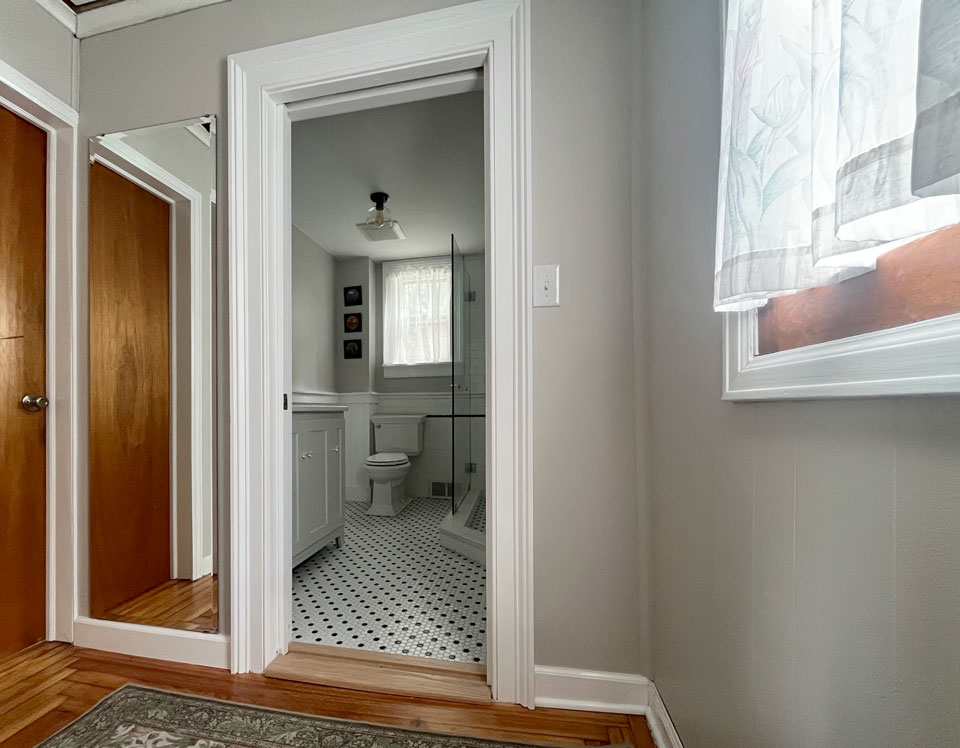
View from hallway
Our journey to revitalize the cottage's primary bathroom proved to be much more than a renovation; it was an intricate dance between respecting history and embracing modern functionality. Every phase, from the hidden work of demolition and rough-in to the visible artistry of the finishing touches, presented unique challenges inherent to a 150-year-old home. Yet, it was precisely these constraints that fostered our most innovative design choices. For Heidi and me, the ultimate reward is not just a beautifully transformed space, but the satisfaction of knowing we've breathed new life into a piece of history, ensuring our guests will enjoy its comfort and charm for decades ahead.
This Article May Also Interest You: Blooming Wonders: A Celebration of Spring

Taking Our Old Bathroom from Drab to Fab: A Four-Part Renovation Story—Part 3

Part 3: Building Anew from the Bones (Rough-In)
With the raw skeleton of the bathroom exposed and carefully reinforced, the intricate process of the rough-in began. This phase was a delicate dance of integrating modern necessities and precise measurements into the quirky, uneven reality of an old house—a testament to adaptability where design met structural limitations.
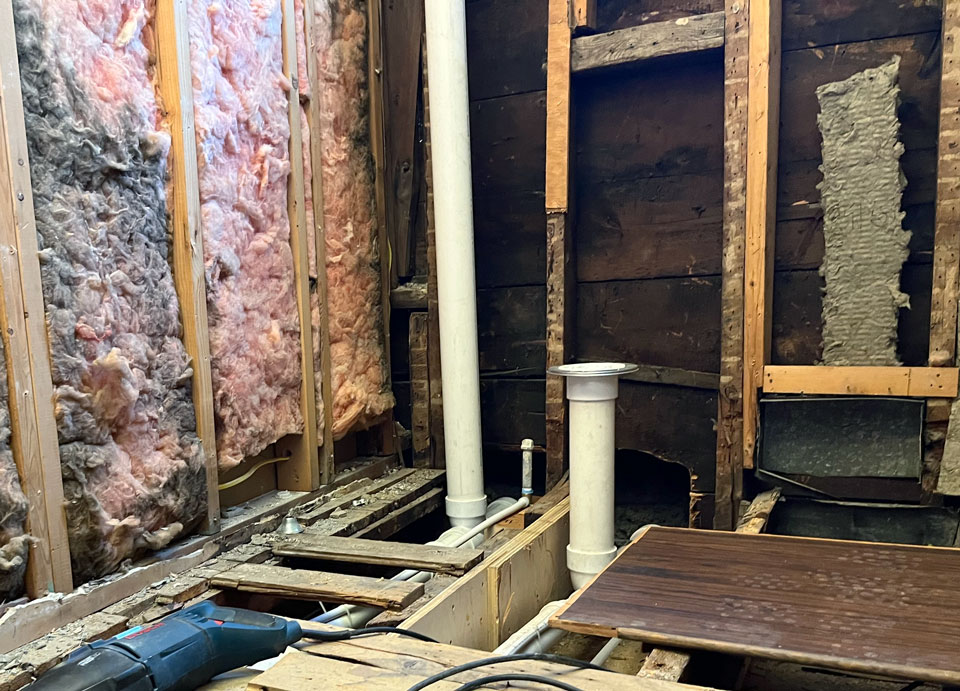
Our rough-in phase was intricately integrated with our ongoing structural repairs during construction. The task of weaving modern and essential features into an antiquated and well-worn structure presented a significant challenge. Elements such as the floor structure, plumbing lines, wall framing and blocking, lighting conduits, and ventilation systems all found themselves in subtle conflict with the inherent limitations of our starting space. When designing for an older structure, countless elements demand adjustment once we delve into the existing framework. We found ourselves compelled to relocate the toilet due to an out-of-square wall, slightly reduce the shower's width and relocate its drain, and even re-introduce a chase to artfully conceal a vent pipe that, contrary to our original plans, proved impossible to entirely relocate.
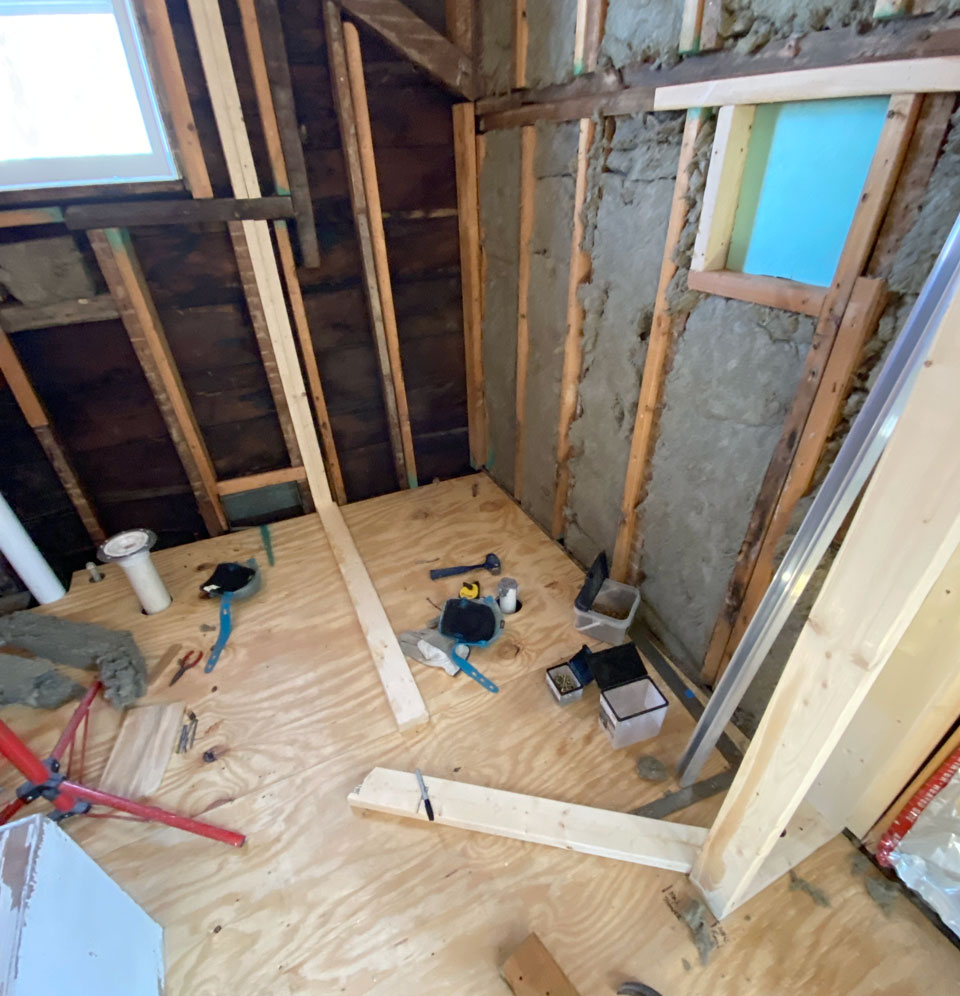
Our plumber skillfully roughed in the new drains and supply lines with remarkably few complications. We had, however, anticipated certain issues with the shower’s water supplies. These critical elements were destined for a new wall that had yet to be constructed. Further complicating their precise placement was the imperative for walls to be perfectly square and plumb, a necessity driven by the subsequent tile floor and walls. The toilet’s placement was similarly affected by the tiling; the house's back wall in the bathroom is out of square by a noticeable two inches, a reality that mandated additional space off that wall for the toilet flange.
The very structure of our space, stubbornly refusing to run parallel, regrettably created a couple of critical clearance issues. Both the shower drain and the water supply for the toilet had to be carefully nudged and adjusted to expertly work around the existing framework.
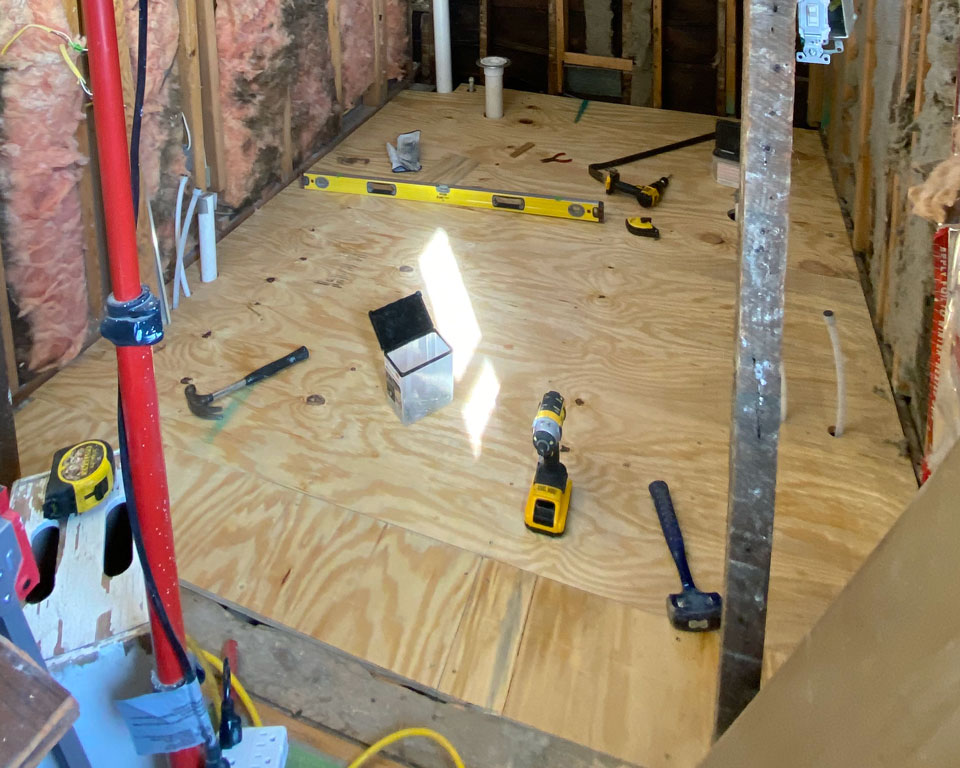
Many crucial decisions regarding the subfloor were, by necessity, made during the structural repairs undertaken in the demolition phase. With a newly established level base, our task simply became sheeting the floor. We chose robust plywood, meticulously attaching it with screws in a tight pattern to firmly lock the boards into place. Where possible, we also endeavored to connect both original and sistered elements, striving to knit them together into a unified, stronger whole.
After the subfloor was securely installed, we were able to erect the short wall that would define the end of the shower and securely house the water controls. The precise placement of this wall was made more intricate by a counter of fixed width. Fortunately, our design foresight had left us with valuable flexibility in the shower's overall length, allowing us to either extend or contract the space as needed.
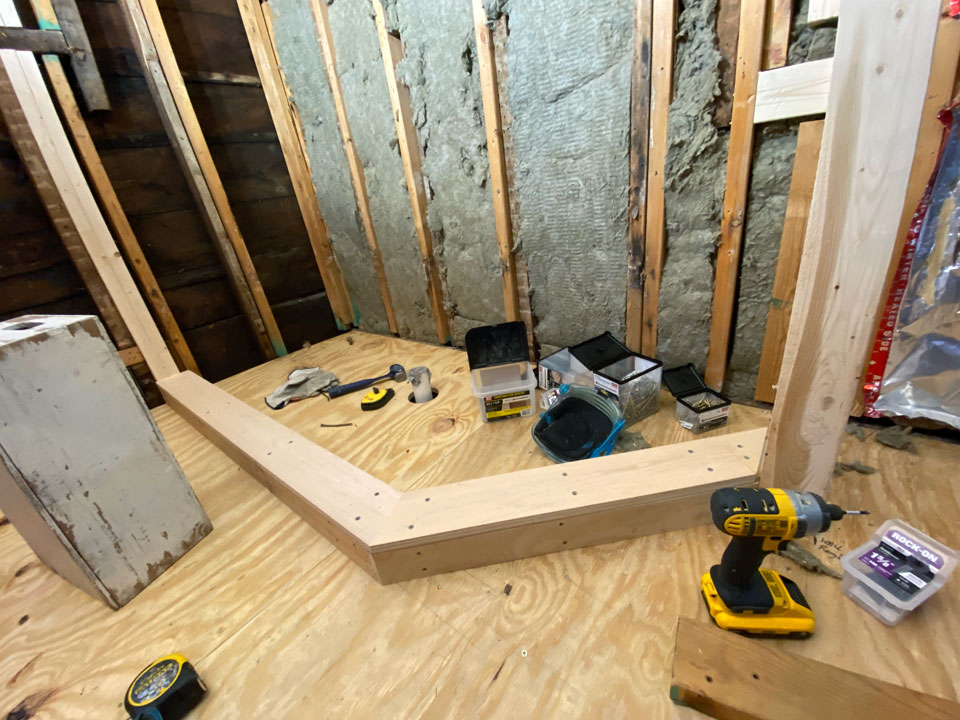
In addition to the adaptable shower length for our new short shower wall, our design featured a shower curb with an initial 30-degree angle at its entrance. Once the subfloor was in place and all elements were mapped out, it became strikingly apparent that a shorter, more acutely angled section would serve the space better. We adjusted our designed angle to 45 degrees, a change that serendipitously allowed us to increase the shower glass by a precious inch. This seemingly small adjustment yielded a significantly more comfortable space to move through. Another significant rough-in modification to the shower curb involved its construction. We incorporated a fairly large fixed glass panel in our shower. In response to this substantial element, we judiciously used stacked 2x4s and ensured that this underlying structure connected directly to the floor joists, building the curb as robustly as humanly possible.

One side of the shower area presented itself as perfectly plumb and level, but our opposing back wall, alas, was out of square by a couple of inches. Furthermore, the walls were subtly off plumb, necessitating precise adjustment. Our solution involved simply sistering new studs in perfectly plumb and square alignment. While working within this wall cavity, we also strategically added blocking for the shower glass and thoughtfully framed in any accessories we would require.

The final, crucial structure we built was the intricate framing for the pocket door. It proved immeasurably easier to move materials and equipment in and out while the entire wall cavity remained open. While a pre-fabricated pocket door system could have been purchased, we deliberately chose to custom-build ours due to its intricate integration into a particularly challenging space. Our new bathroom floor now boasts a pristine level, while the floor in the small hall just outside the bathroom conspicuously sags. A pre-made system would have inevitably created an unsightly, large gap between the door and one side of the hallway floor. Moreover, after dedicating such meticulous attention to the bathroom floor to minimize height changes, it became imperative to further seamlessly integrate the two spaces.

The rough-in, a careful ballet of adaptation and precision, ultimately laid the perfect groundwork. It was a phase where flexibility was paramount, allowing the new bones of the bathroom to take shape in harmony with the cottage's enduring character, setting the stage for the artistry of the final touches.

Taking Our Old Bathroom from Drab to Fab: A Four-Part Renovation Story
Part 2: Unearthing the Past (Demolition & Structural Repair)
Demolition, while arguably the most labor-intensive, is paradoxically the least seen segment of any project. In our case, it was a meticulous deconstruction of our existing bathroom space, a chaotic but necessary step that laid bare the surprises and challenges hidden within the cottage’s century-and-a-half-old frame.
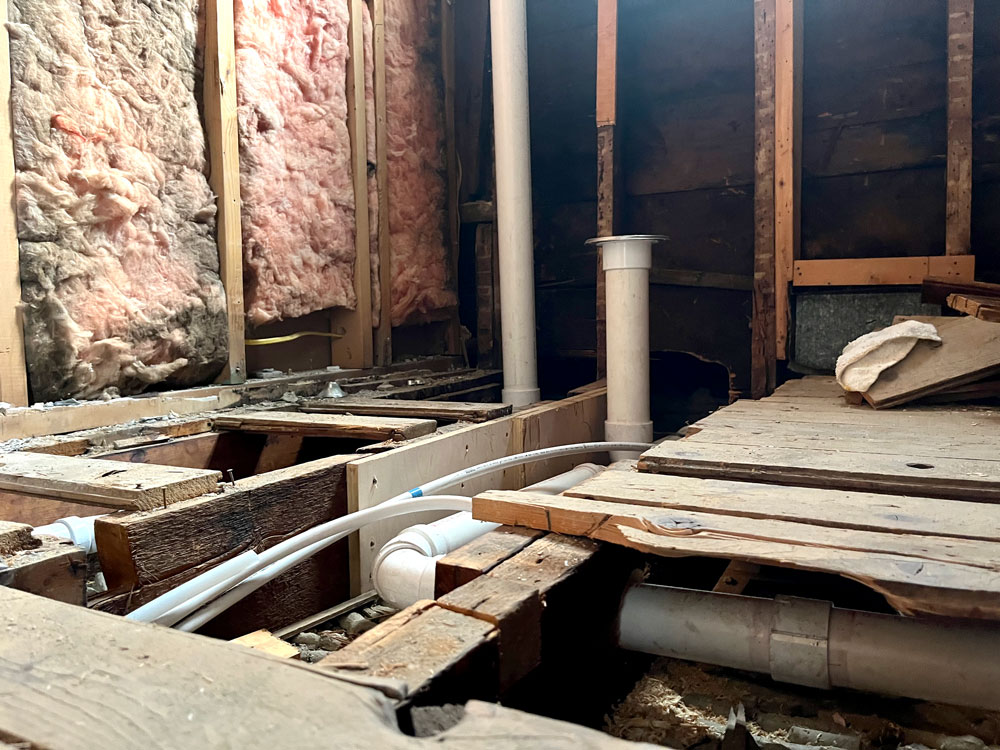
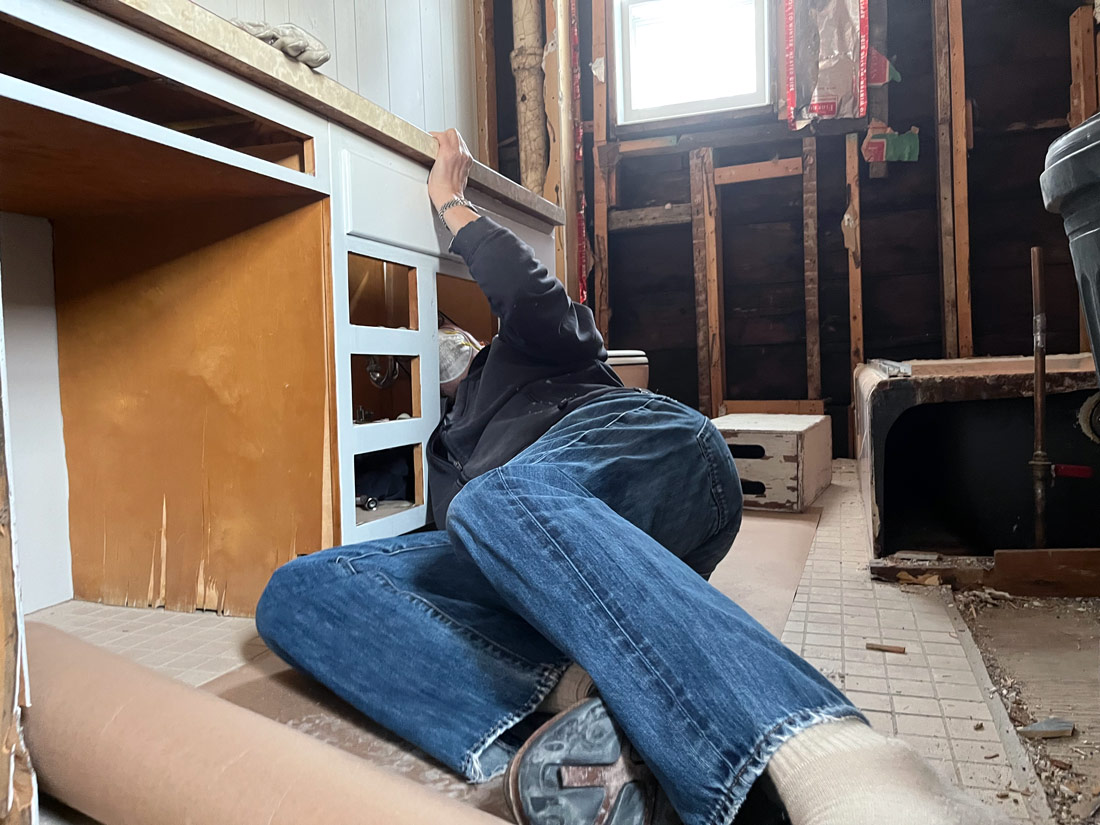
Our approach to demolition, just as with design, was driven by clear objectives. This was our singular opportunity to rectify existing damage, correct past mistakes, and physically verify our design within the actual space. While some anticipated damage to the floor structure was indeed present, we also unearthed peculiar wall structures, patchy and degraded insulation, and even multiple ceiling layers, including a surprising tin ceiling at one point.
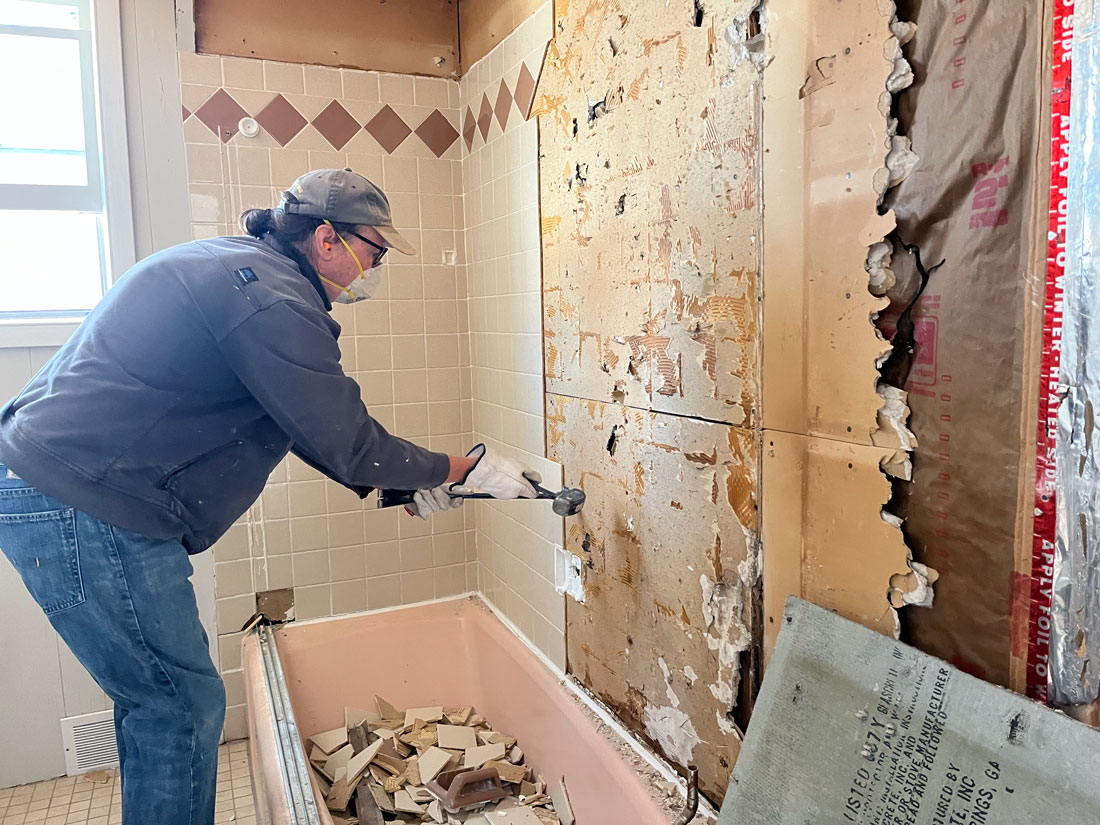
We began by carefully dismantling and removing every fixture: the vanity, toilet, doors, electrical switches, outlets, lights, plumbing fixtures, closet doors, and shelves—literally anything that could be disconnected and detached. This was followed by the systematic removal of the walls, existing tile, and ceiling. Our final deconstruction phase involved dismantling the underlying structures and the old subfloor, which, in our particular situation, included an out-of-sequence plumbing fixture: a formidable cast iron tub. The project's ultimate demolition segment was then left to our plumber, Scott, who swiftly cleared away the multiple layers of ancient-to-old plumbing that had accumulated in the space.
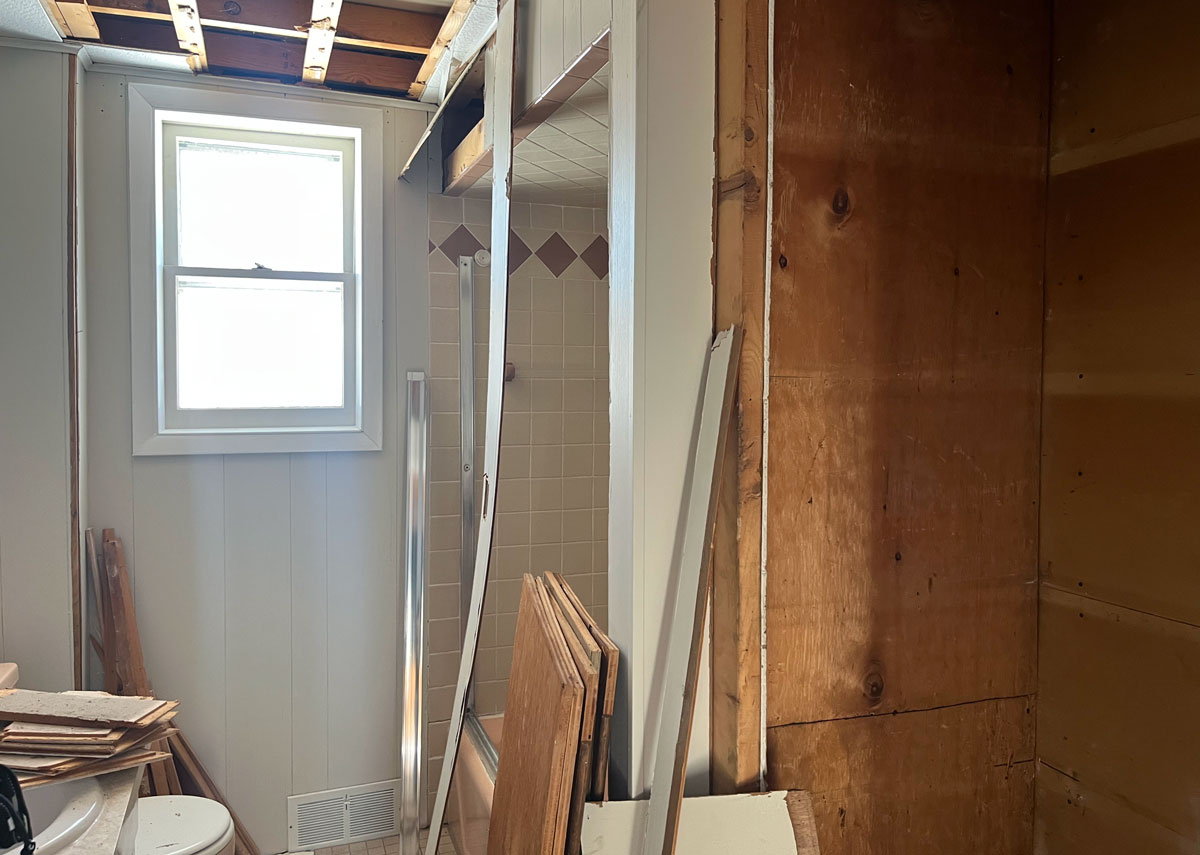
As we commenced, the surprising ease with which some parts of the bath yielded should have served as a prelude to the stranger anomalies we would soon uncover. While all the fixtures had been functional, some elements were robustly built, while others were undeniably shoddy. The vanity, for instance, simply disintegrated once we removed its countertop; its four sides and bottom effortlessly pulled apart. The closet, conversely, seemed to be held together by a million nails.
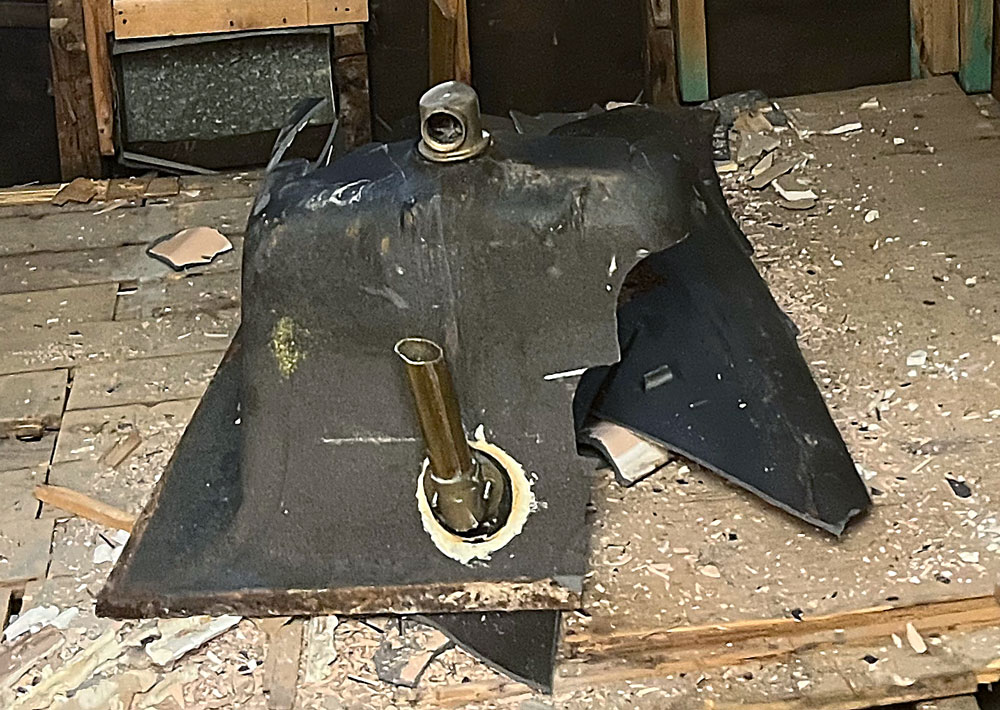
Likely the most formidable item to remove was the 1950’s cast iron tub base. While its color, in another era, might have been fashionable, its construction was undeniably built to endure anything. The casting was brutally strong, its thickest parts strategically placed on the curves. This demanded that we employ a cutting wheel to surgically slice through the curves, segmenting the tub for removal.

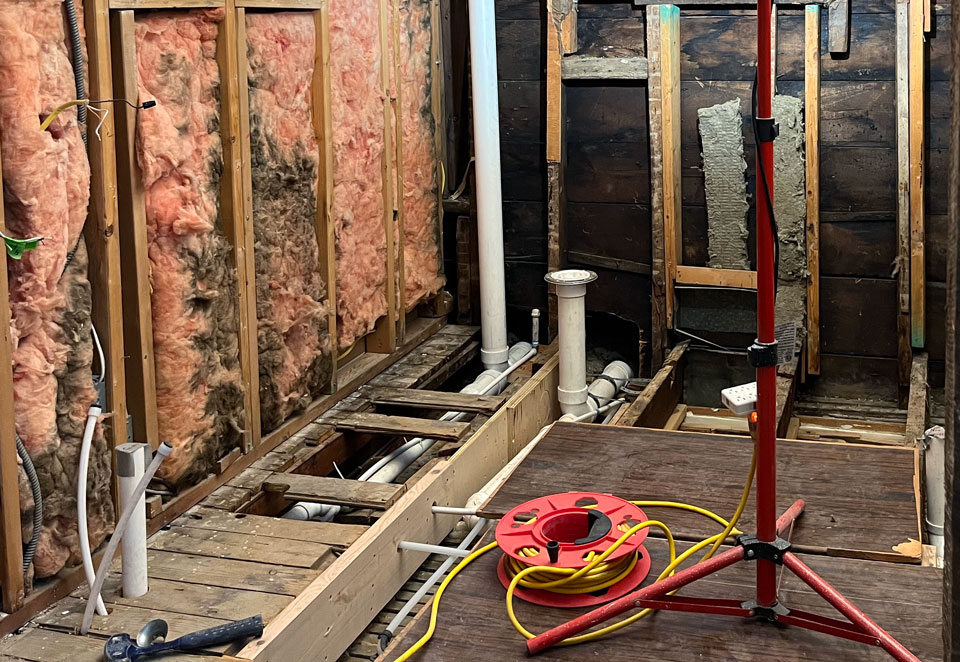
Fortunately, we discovered some of the original cutouts made for pipes, remnants that proved invaluable. We utilized these to precisely fill the cutouts and then diligently sistered new pieces onto the existing joists to effectively reinforce the floor structure. It’s a common sight in older homes: plumbers, in their haste, often cut out sections of the structure to accommodate plumbing. This often leaves a structural floor joist effectively as strong as only its thinnest remaining section. We found old 2x8-inch joists that were, in various sections, effectively reduced to two to five inches thick. Our solution involved employing 2x8s for larger repairs, and cabinet-grade plywood for smaller notches where we had the original cutout.
We were genuinely surprised to uncover that the 1959 renovation in the space did, in fact, incorporate insulation. However, sixty-year-old fiberglass had been significantly compromised by decades of shower leaks and other environmental factors, degrading it to a point where new, modern insulation was the only sensible choice. We opted for Rockwool to insulate the space. This innovative product, composed of spun rock, boasts a slightly higher R-value and, crucially, is hydrophobic, meaning it resists degradation even when exposed to moisture.
Rot and insect damage are perpetual concerns in a house of this advanced age, yet we were fortunate to find few problems that demanded extensive attention. While there was discernible water damage to some drywall around the shower and certain staining on the floor structure, critically, there was no rot or structural damage found within the room’s main supporting elements.
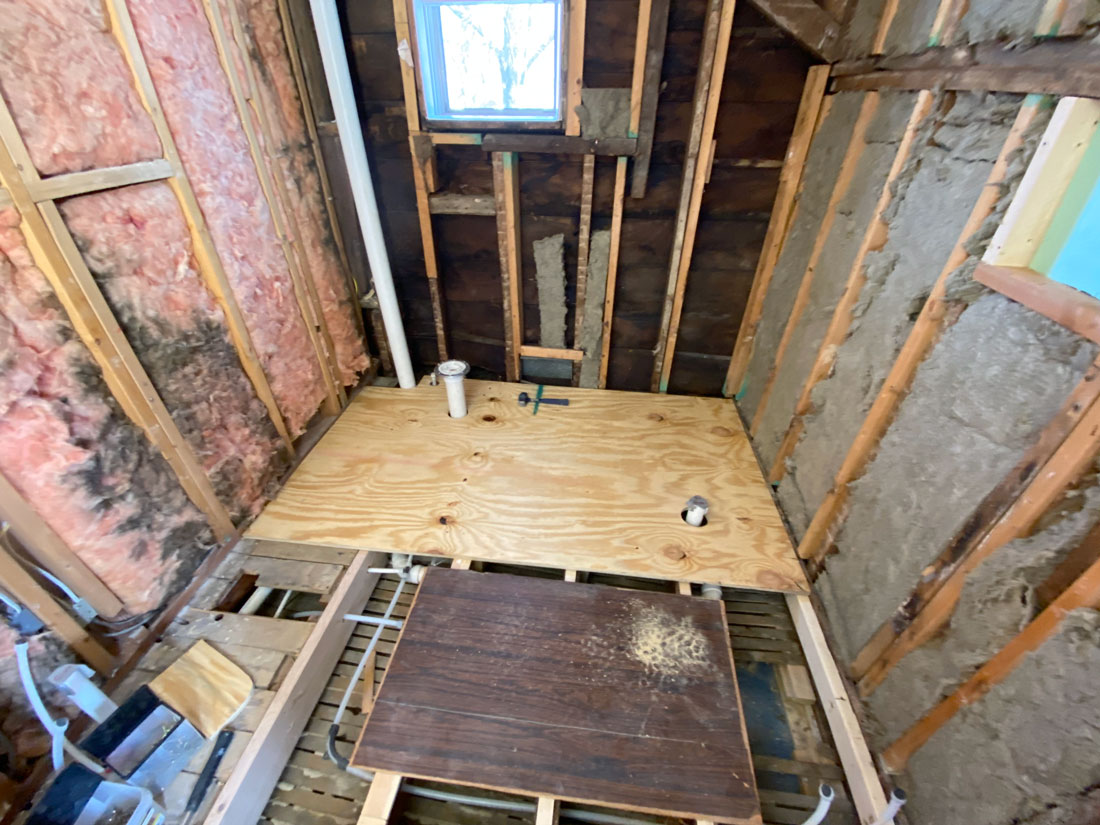
Perhaps the most crucial aspect of the demolition and repair phase revolved around the floor. The second-floor floors of our old house had, as is common, settled and sagged over time. The new floor demanded a level base structure, and it made perfect sense to correct this level as we patched the structural cutouts and holes. The entry to the bathroom further complicated this endeavor. With a floor at least a century old, the transition to a newly leveled floor required meticulous consideration. Our priority was to avoid simply leveling the floor only to create an awkward height differential that would perpetually pose a tripping hazard. Our ingenious solution involved an averaging leveling process. We commenced by carefully lowering the first joist that connected to the outside structure, reducing the overall height increase by nearly an inch. This cumulative approach led to an almost two-inch adjustment in the floor’s overall level, yet remarkably resulted in only a three-quarters of an inch final height change at the doorway passage.
An unexpected, yet immensely helpful, outcome of the demolition process was our ability to finally remove the last used elements and, more importantly, turn off a vexing electrical circuit that had been the source of many house-wide mysteries. The bathroom, as it turned out, housed the last active leg of this perplexing loop for its lighting. While our preference would have been to locate and definitively remove the mystery links, completely shutting down the circuit proved to be a satisfying and welcome alternative.
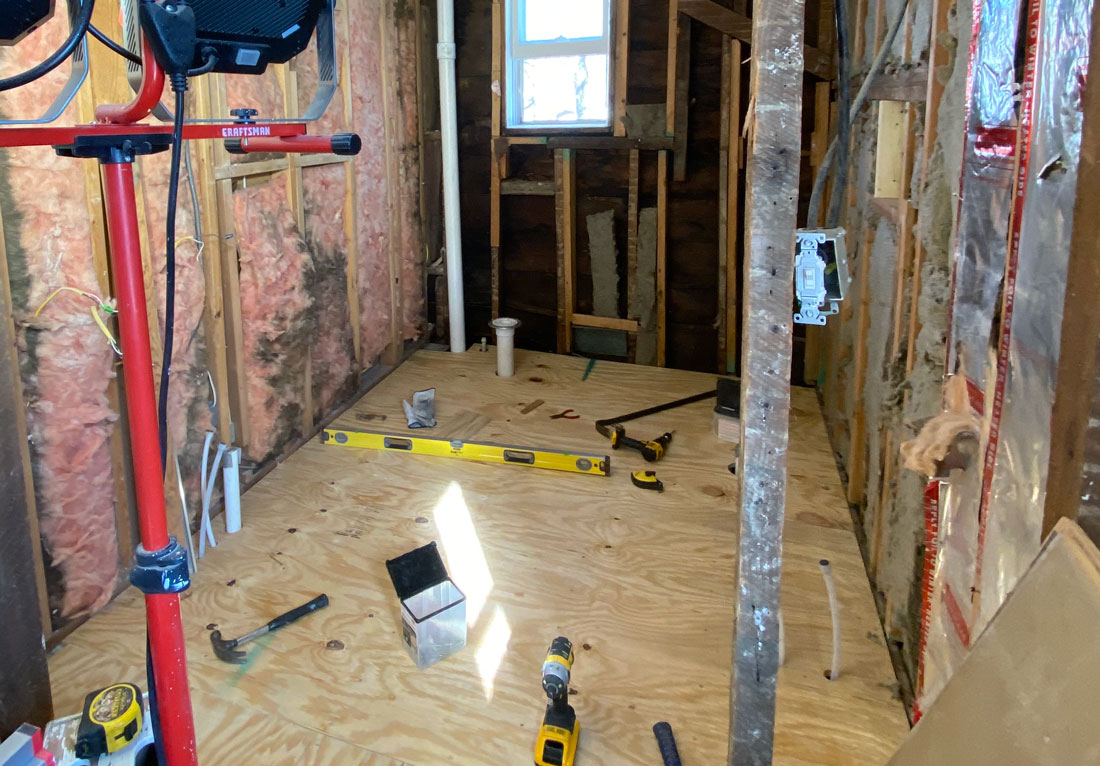
Once the space lay open, we gained the invaluable ability to precisely map out our design, making necessary adjustments and indicating exact locations for the drains and supplies that would be roughed in. With the area exposed, it was easy to discern where elements of our initial design might conflict with existing structure, or where space might be unexpectedly gained or lost due to repairs. The primary adjustments revolved around the toilet drain's location, the precise placement of the vent fan, and the shower's final width.
Demolition, though far from romantic, proved to be the most critical part of the job, our longest phase. Its careful execution laid a solid, level foundation, allowing us to confidently move into the next challenging yet rewarding stage: the rough-in.

Taking Our Old Bathroom from Drab to Fab: A Four-Part Renovation Story
Part 1: The Vision and the Vanishing Act (Design & Demolition)
Our bathroom redesign was never just about new tiles and fresh paint; it was about honoring the past while crafting a modern haven for the future. This journey, a true iceberg project with most of its crucial work hidden from view, began long before any hammer struck a wall. It started with a vision, a meticulous planning phase that laid the groundwork for everything that followed.
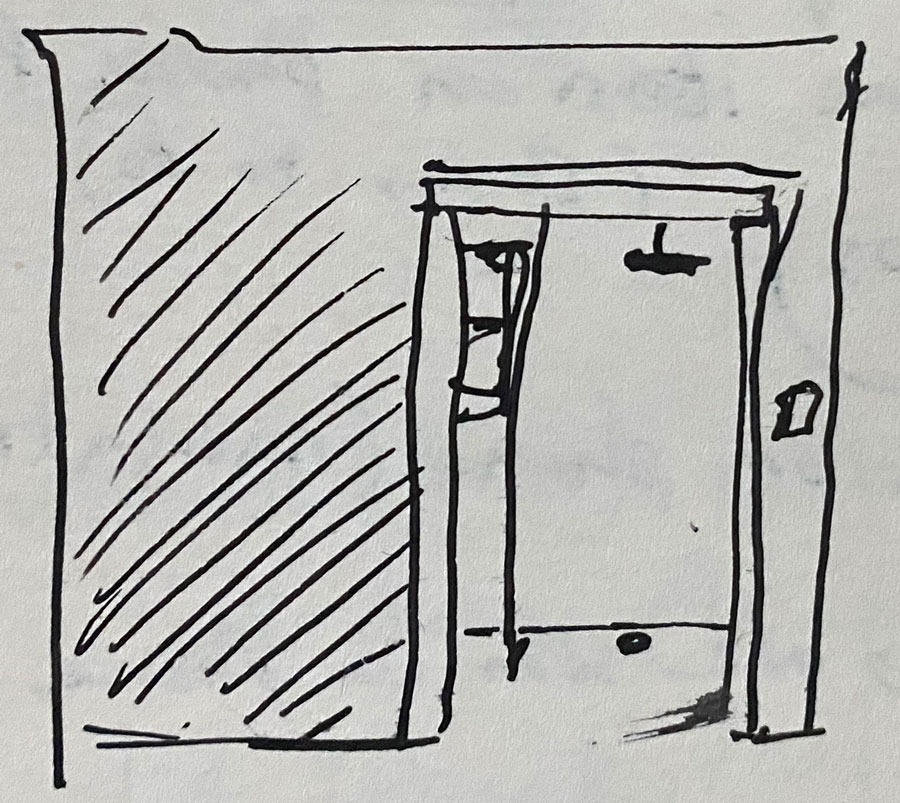
An early sketch showing the view into the bathroom
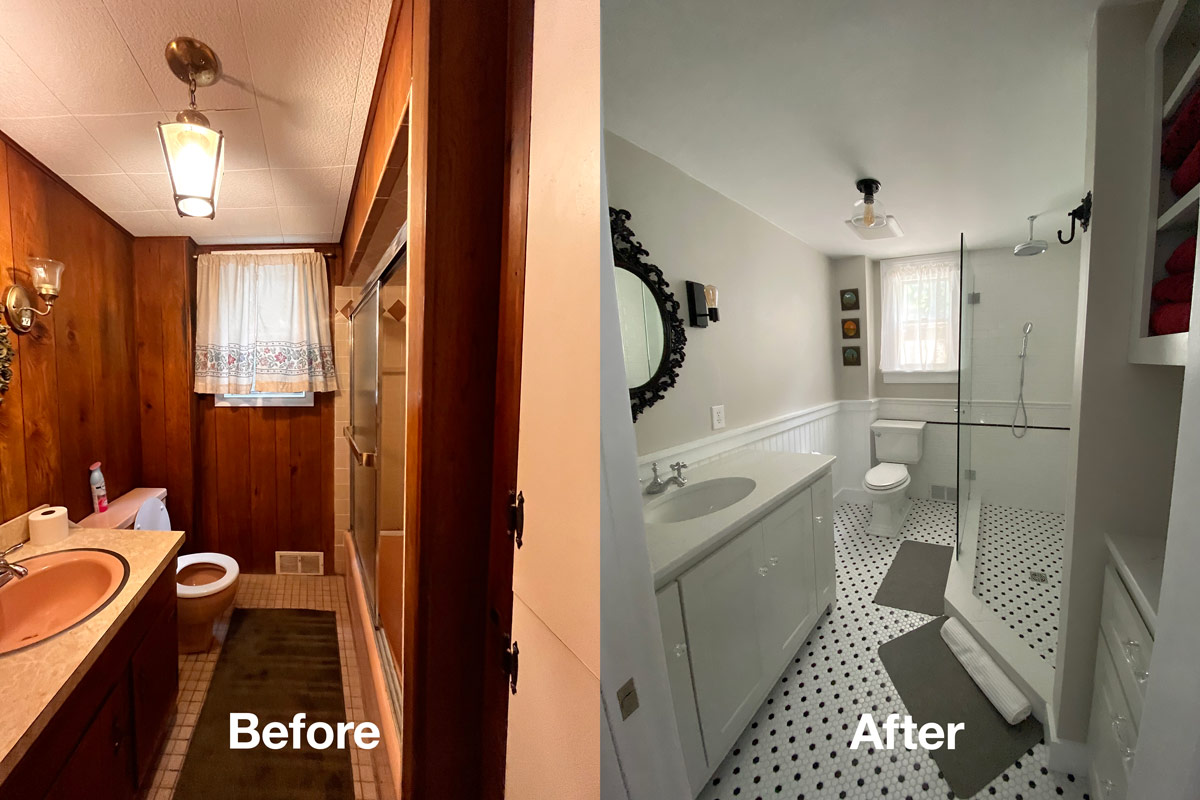
The second-floor bathroom in our 1875 cottage, with its distinct 1959 aesthetic of period colors and finishes, presented a charming puzzle. While many of its mechanical elements had received updates over the decades, the unusually large closets hinted at a story we couldn’t quite decipher. Our redesign crystalized around two core ambitions: first, to replace the venerable, century-old plumbing infrastructure with robust, modern lines; and second, to forge a more functional, inviting space that would elevate even the briefest stay. Though the room itself was an intimate nine by seven feet, our focus on short-term guest comfort unlocked a wealth of thoughtful design opportunities.
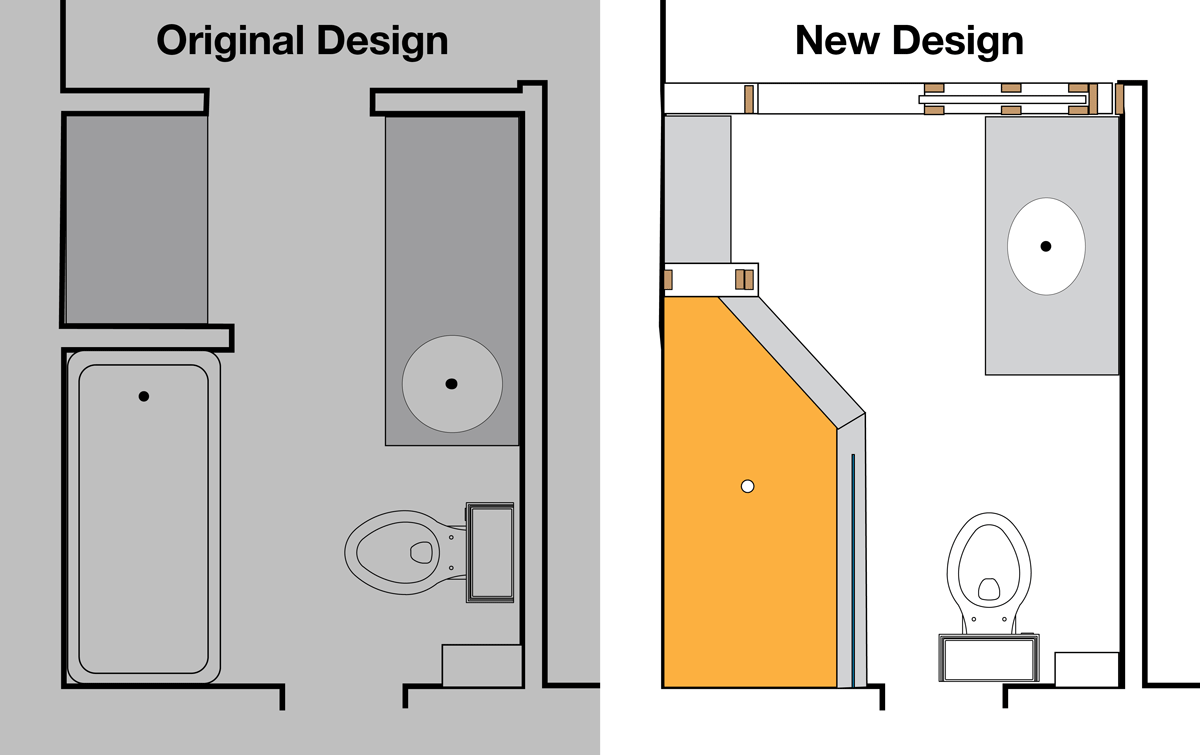
Before and after floor plans
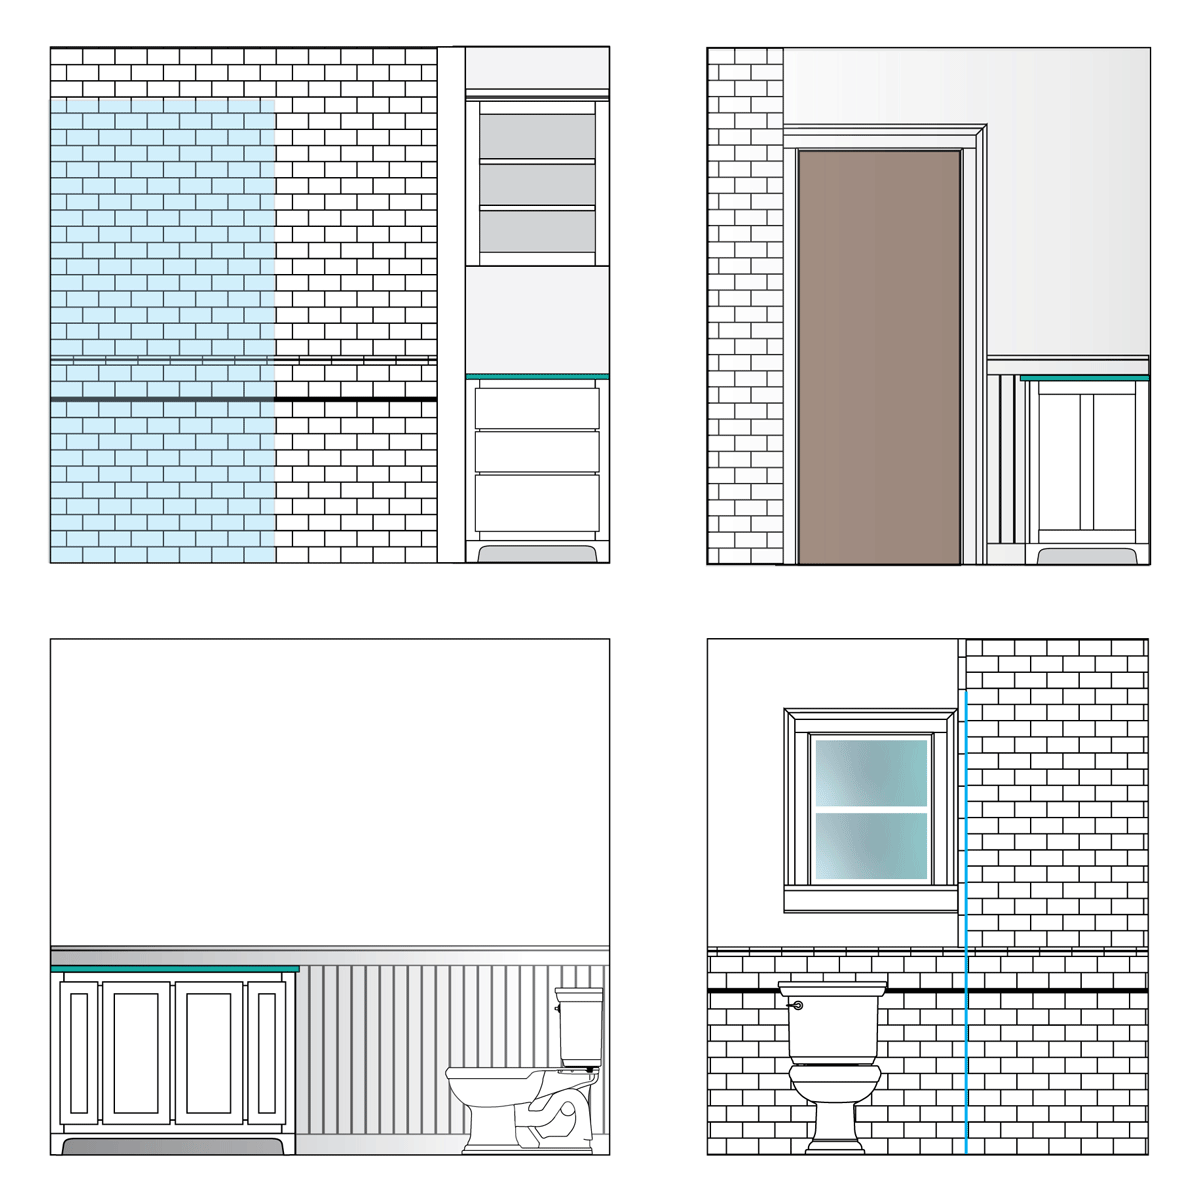
Elevations
Our new design gracefully navigated the original layout with only subtle shifts. We gently pivoted and repositioned the toilet, a move we later delighted to discover returned it to its original 1875 location. The bathtub, a relic of the ’59 renovation, gave way to a sleek, modern shower, complete with a luxurious rain shower head and a practical handheld sprayer. The vanity, too, largely remained a comforting anchor. Guiding our vision were a few primary considerations: the bath had to exude a clean aesthetic correct for the house’s heritage, feel demonstrably more spacious, and offer fundamental functions for a genuinely comfortable visit.

A signature design element, one destined to reappear throughout the cottage, is our newly conceived molding design. Months were dedicated to researching styles in similar-aged Saratoga Springs homes, allowing us to craft a look that subtly echoed the Queen Anne Victorian influence of the cottage’s early growth period. This intricate design, with its mitered inner beads and chamfered outer edges, promises to infuse our new spaces with authentic character.

Part of enhancing guest comfort involved the new cabinetry. The original bathroom harbored a massive vanity and an overwhelmingly large closet—far more space than anyone could need, and a regrettable factor in shrinking the room. We approached storage differently: a custom-built vanity two inches narrower than standard provided comfortable counter space without impeding entry. The colossal closet dramatically shrunk, replaced by a narrow cabinet and shelves that deliver ample utility within a minimal presence, creating an inviting, open entry. Our cabinetry design embraces a timeless simplicity: flat panel rail and stile doors and drawer fronts, elegantly adorned with antique glass knobs and pulls—a style common in Saratoga Springs homes from the house’s period. These meticulous details are cornerstone in infusing the bathroom with the original character it required.
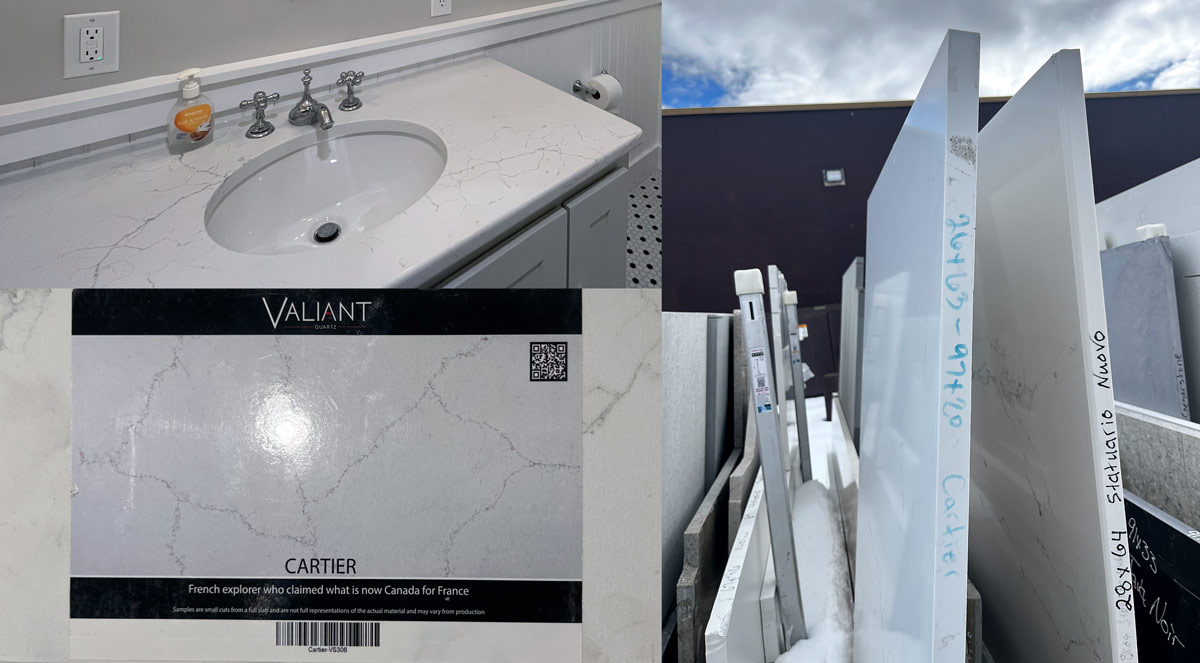
We also chose to invest in the counters, fortuitously finding a quartz remnant with a subtle grain that varied beautifully in color and weight. These counters are simply stunning, drawing you into the space. Beyond their aesthetic allure, they demand no sealing or maintenance. In a stroke of pure luck, we even had enough material for the shower curbing, solidifying the space's cohesive feel.
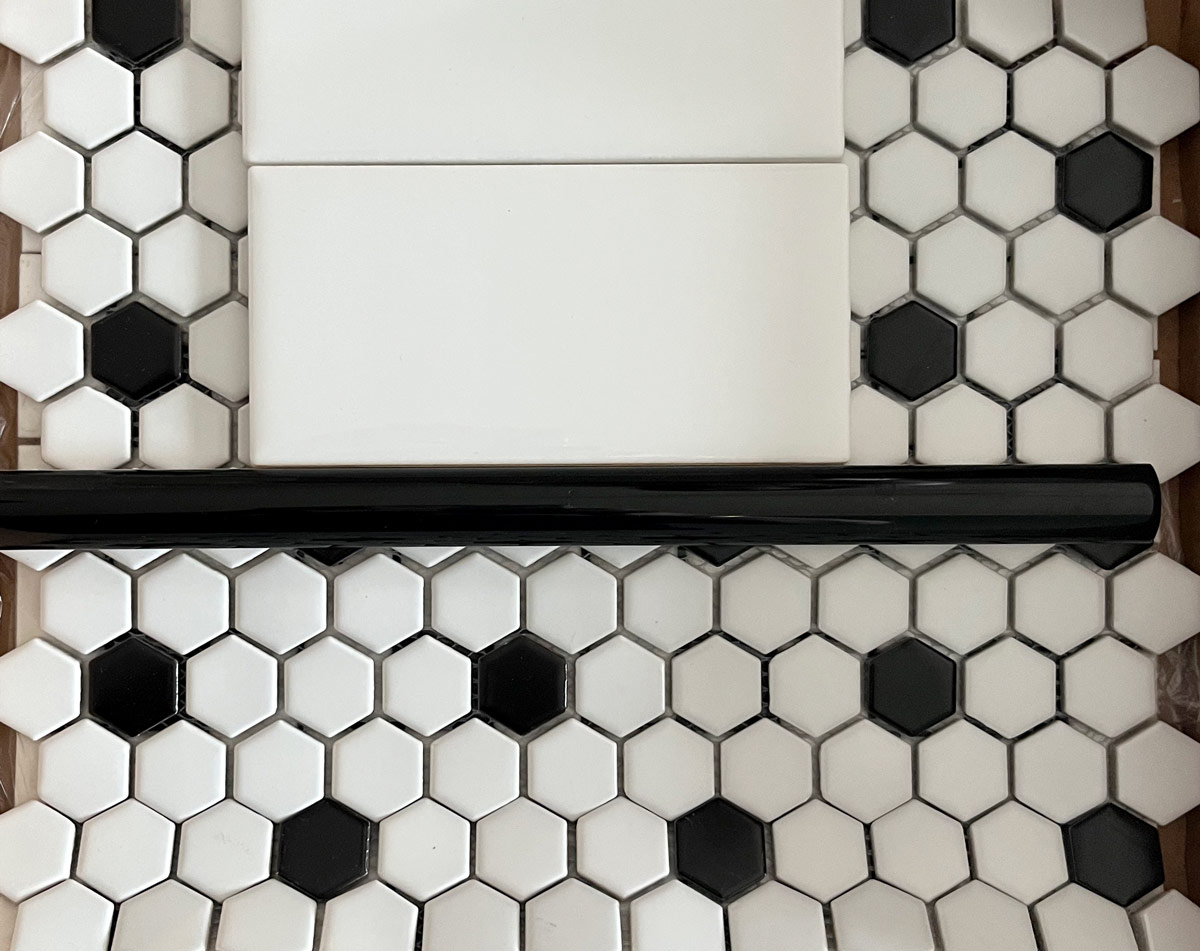
Some of our tile
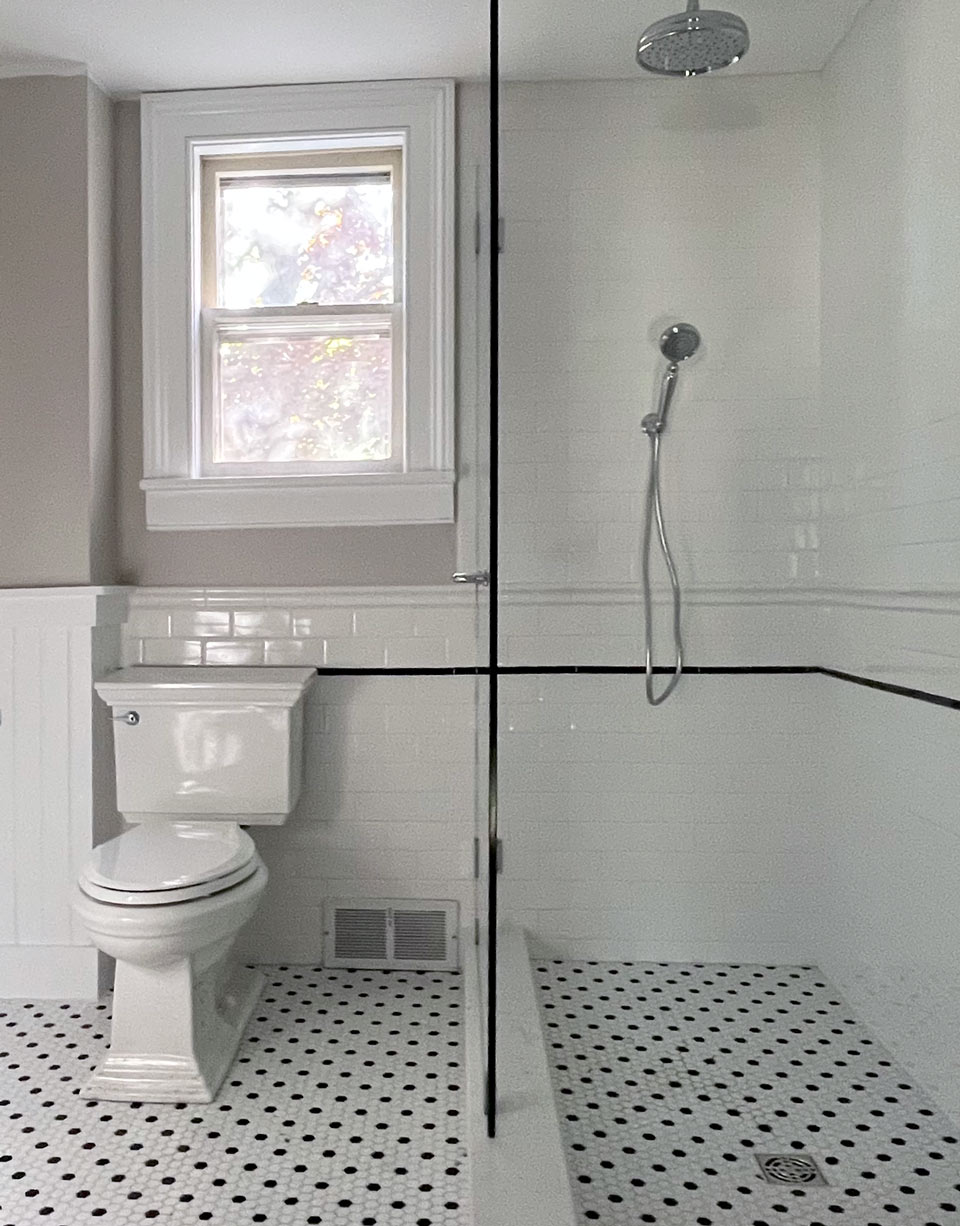
View showing wainscot tile transition into shower
Heidi and I consistently find that an authentic, classic look can be achieved using surprisingly modern, even inexpensive, materials. Most older bathrooms share elements that, when skillfully applied, imbue a new bath with timeless character. Our first signature element is a tile wainscoting that elegantly transitions the tile from the shower surround to the rest of the room. Our floor tile, a classic hex with strategically placed black accents, is a ubiquitous sight in vintage bathroom designs.
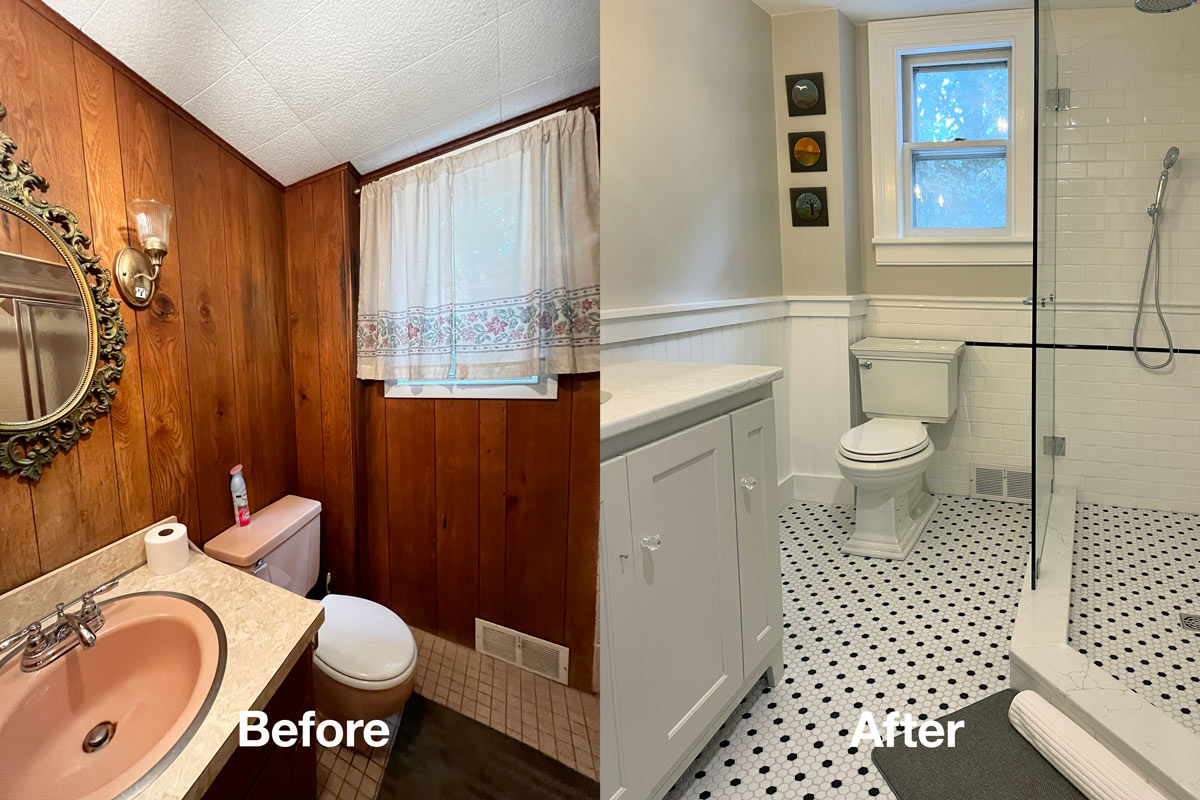
Before and after shots looking into bathroom

Before and after showing expanded entry
Designing this bath for lighter, short-term use proved easier than accounting for the heavy demands of a primary residence. This freedom allowed us to intelligently remove excess storage and dramatically open up the space. The impactful decision to remove the overly large original closet added almost 25% more usable room to our compact bathroom. This pivotal change, coupled with the switch to a space-saving pocket door, represents perhaps the most dynamic transformations, liberating nearly three feet of precious real estate previously devoured by the old door and closet.
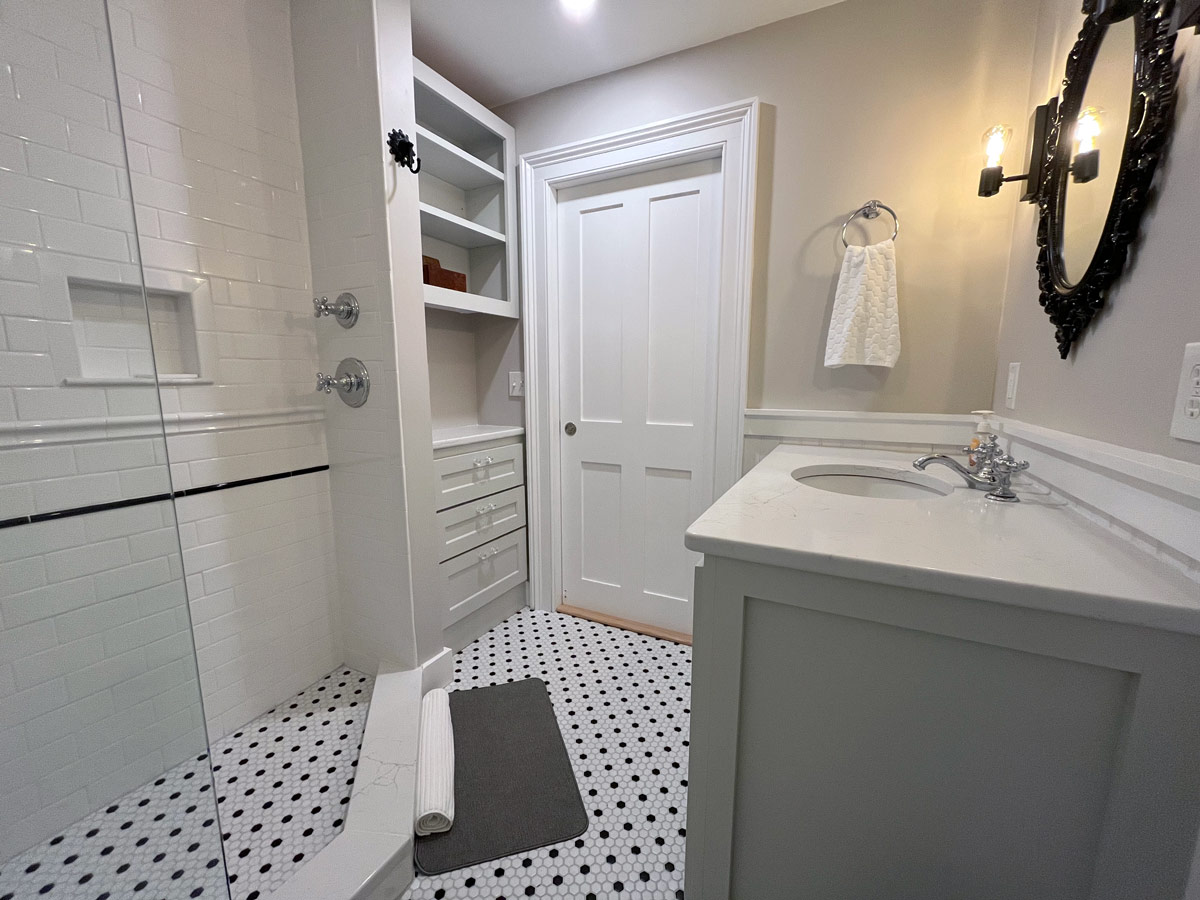
To ensure our new bathroom functions as exquisitely as it looks, we made the conscious choice to install premium fixtures. The vanity top, sink, smaller counter, and shower curb trim are all crafted from a durable Quartz product. We consistently chose Kohler products—sourced through a certified supplier—for the toilet, shower valves, shower heads, and sink faucet, having experienced excellent reliability. While this investment exceeds some mass-market options, the discernible quality and superior performance are unequivocally worth it. Moreover, Kohler offers designs that beautifully complement older homes, harmoniously blending modern functionality with a truly classic aesthetic.
The vision was clear, and the path laid out. With plans solidified, the painstaking work of demolition began—a chaotic yet crucial ballet of dismantling that stripped away decades of history, revealing the raw bones of our cottage.
This Article May Also Interest You: Two Years, and the Journey Continues
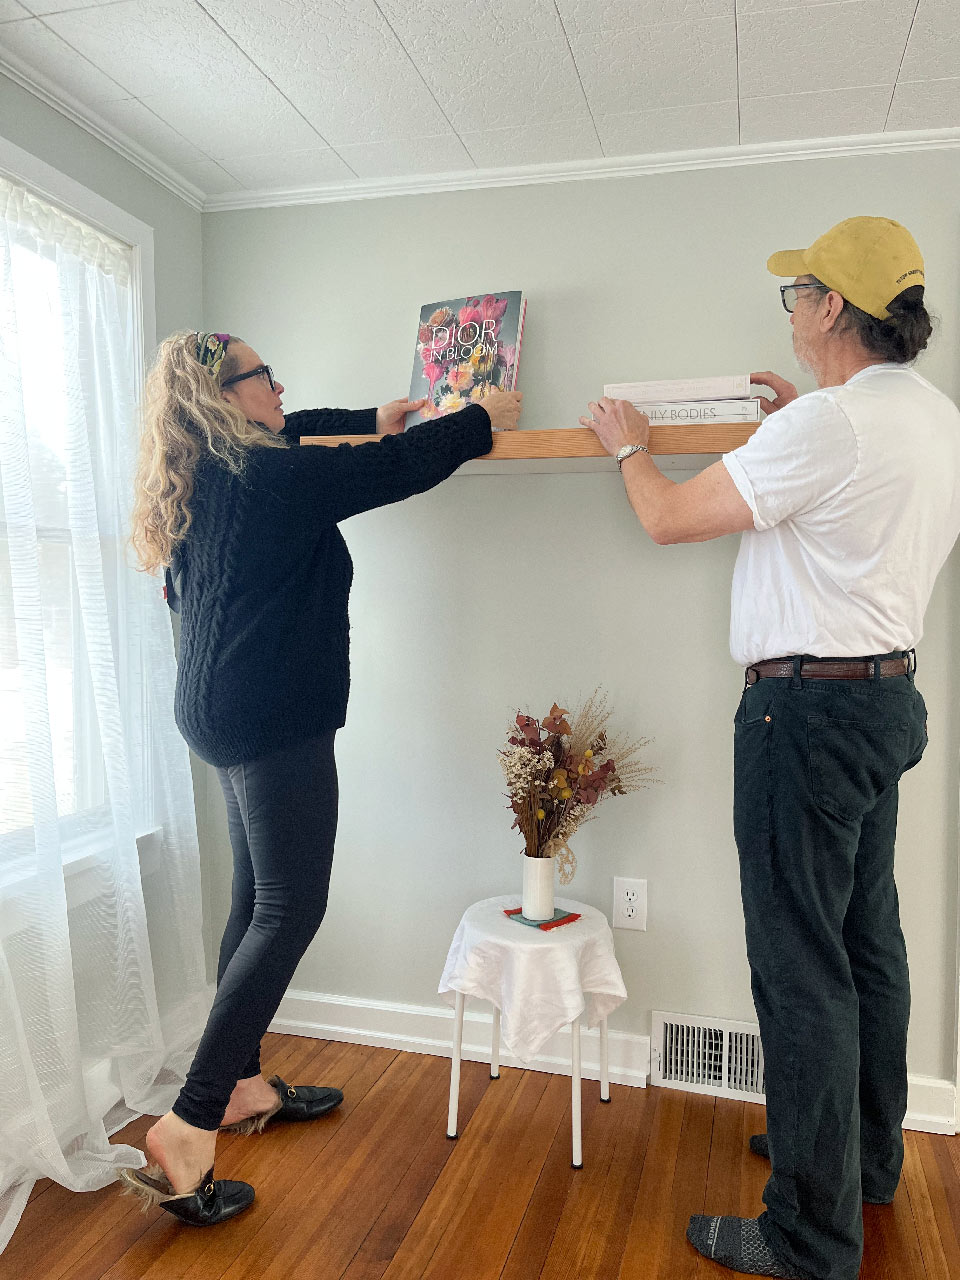
Floating Shelves: The Art of Simplicity and Style
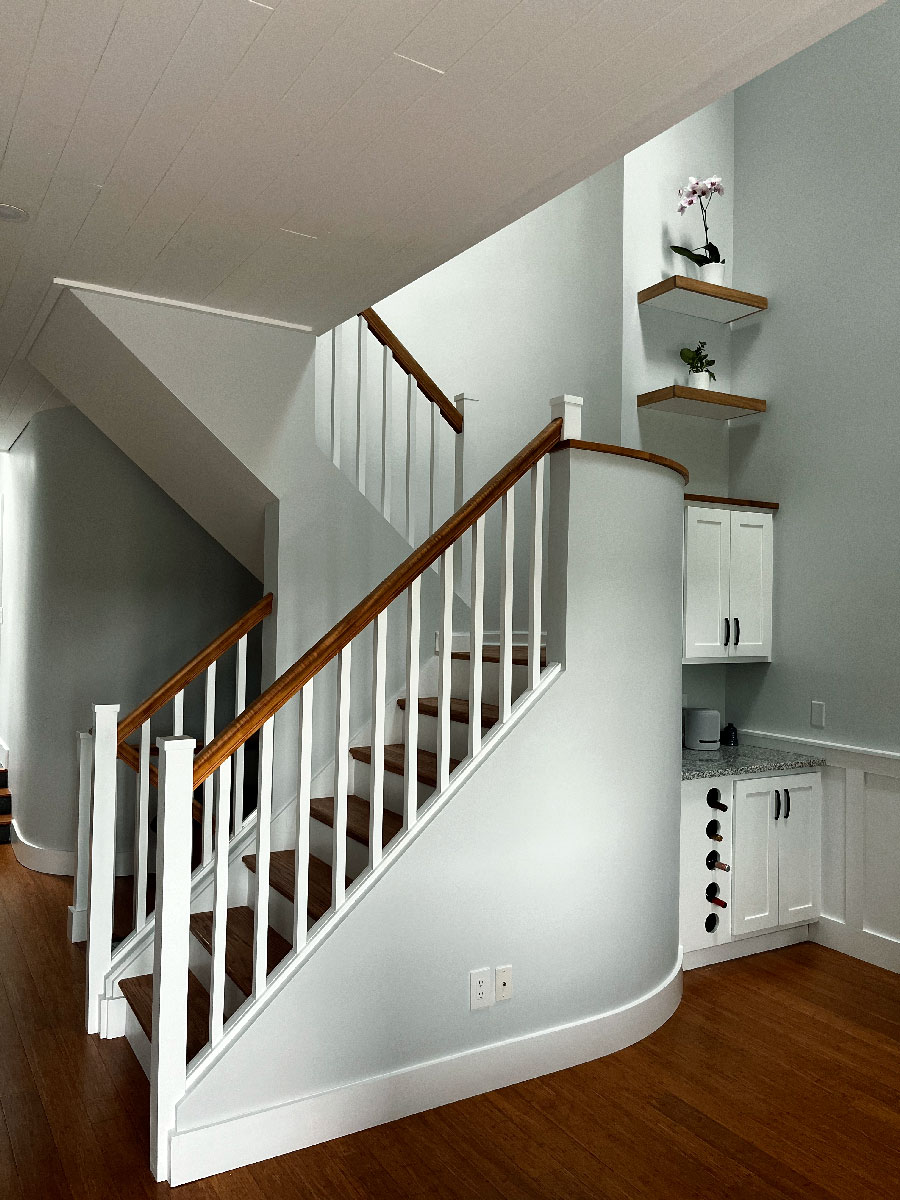
Floating shelves have become a go to design element for those looking to add functional storage with a minimalist touch. They are the perfect solution when you need a display area without the bulky look of traditional cabinets. We have used floating shelves in many spaces, and they have never disappointed. Whether it is creating a display without overwhelming a room or offering storage with sleek elegance, floating shelves can do it all. Let us walk you through a couple of recent projects that really showcase the beauty and versatility of these shelves.
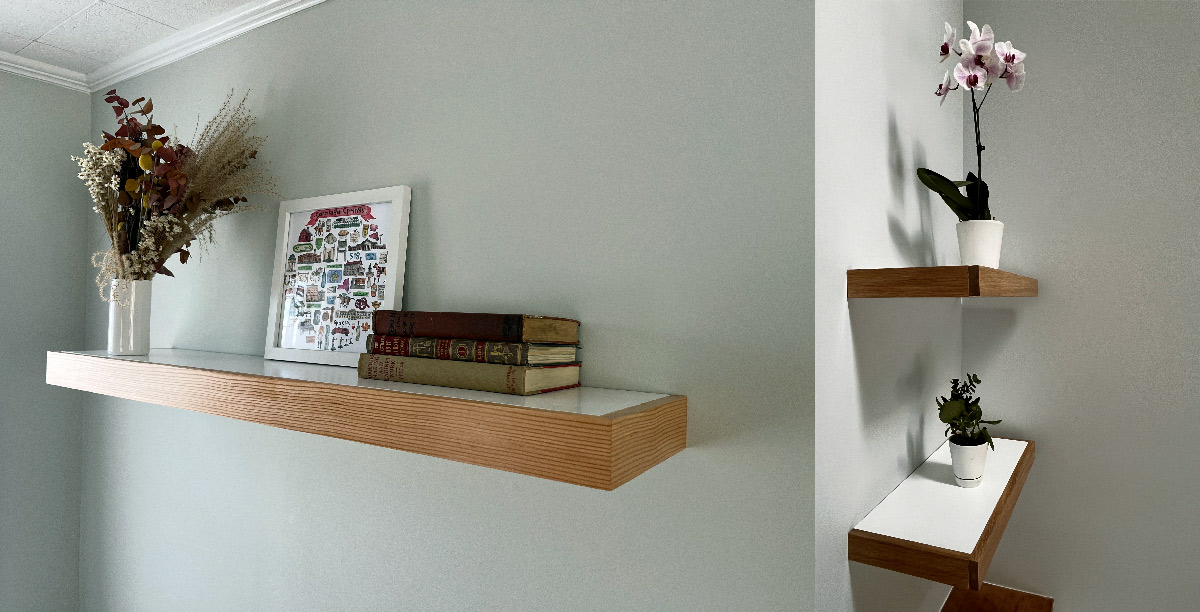
Our Recent Floating Shelf Projects
Take, for example, the project we refer to as Jenn's Coastal Mid-Century Home. For this space, we installed two floating shelves that were 26 inches wide, 11 inches deep, and 2 ¼ inches high. We chose quarter-sawn white oak for the finish, which complements the bamboo flooring perfectly, giving the shelves a natural yet refined look.
For a different vibe, we built a single, larger floating shelf for our guest house, known as Paul's Cottage — 42 inches wide, 9 7/8 inches deep, and 2 3/8 inches high. This shelf is wrapped in the rich, textured grain of Douglas Fir, tying beautifully with the cottage's red spruce floors. Each shelf, though simple, plays a significant role in elevating the space.
What Makes Floating Shelves Stand Out?
One of the coolest things about floating shelves is that they appear to defy gravity. They give the illusion of “floating” on the wall without visible support, making them look sleek and modern. While you can find shelves made from thick, heavy wood, sometimes up to 4 inches thick, we prefer a more refined approach. In our experience, shelves around 1 ¾ to 2 ¼ inches thick provide the best balance of strength and visual appeal for the spaces we work with.
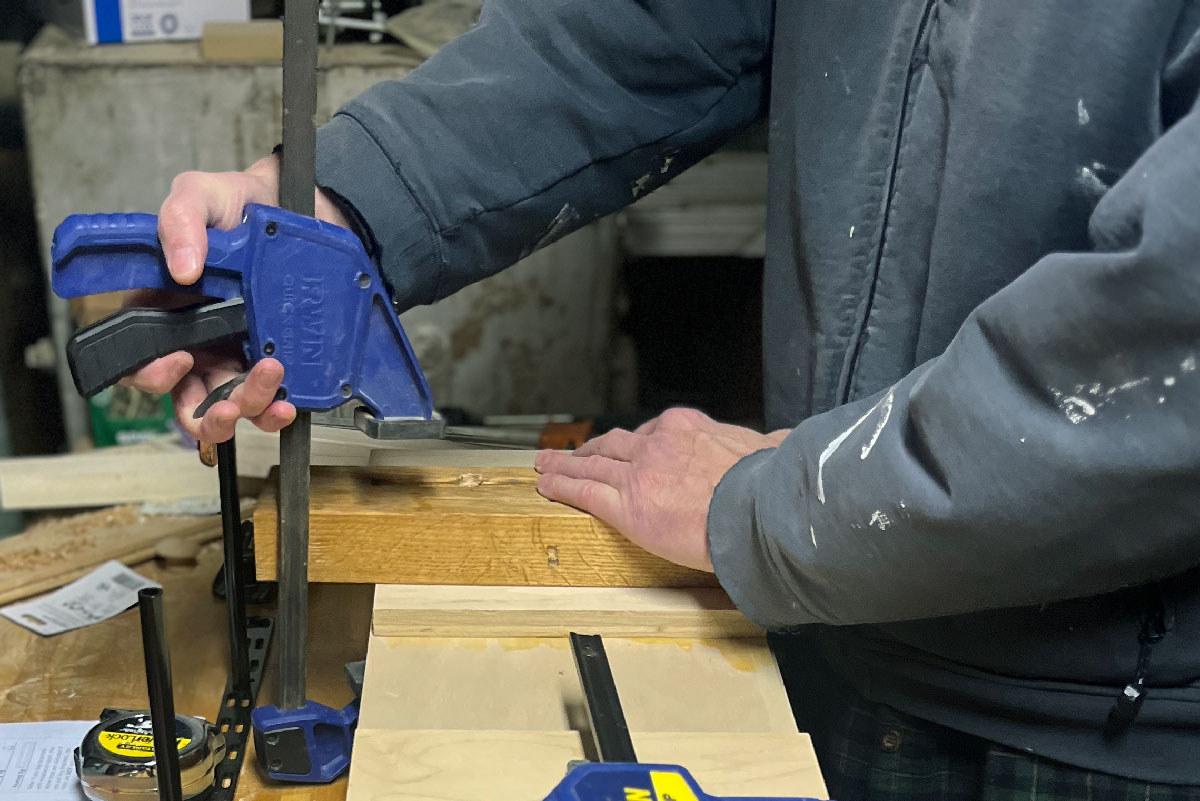
We also like to create a “skeleton” out of plywood (usually painted to match the room's trim color), which forms the inner structure of the shelf. This painted skeleton is then wrapped with a wood band that matches the room's design, ensuring the shelf blends in seamlessly with the rest of the space.
Building a Floating Shelf
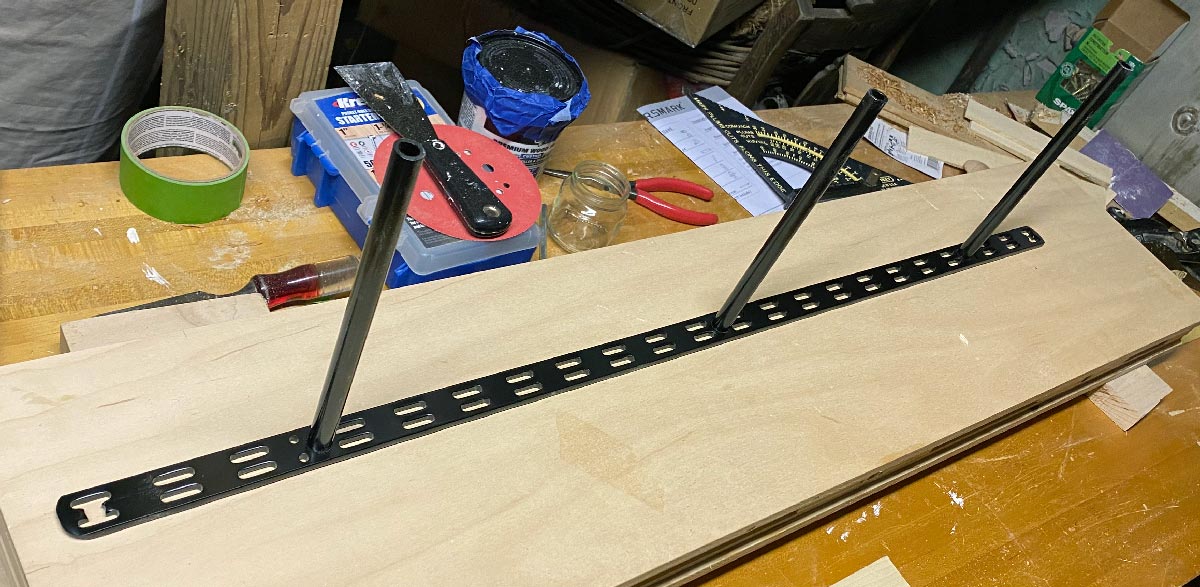
Building a floating shelf might seem simple, but there are a few crucial steps to ensure everything works as it should without sacrificing style. The right bracket choice is key, and we typically opt for steel bars with welded rods. These allow for easy adjustments and make sure the shelf is firmly anchored into the studs. When selecting a bracket, we always go for the largest one that fits, the deeper and wider, the more securely the shelf will sit.
Here's what you'll need to build a floating shelf:
- A drill with a 1/2-inch chuck
- A 9-inch-long drill bit to match the bracket rods
- Heavy-duty screws (#9 or #10)
- Drywall or plaster anchors
- A level
- Wood glue, a biscuit joiner, clamps, and a few other standard shop tools
We start by determining the size and material for the shelf, then order the right brackets. The goal is always to pick the bracket that will support the shelf without being visible once it is mounted.

Materials and Techniques
The material I use for the internal structure is typically cabinet grade plywood, which is sturdy yet easy to work with. In one project, the shelf ended up being 2 ¼ inches thick, made from ¾-inch plywood for both the top and bottom, with additional ribs sandwiched between for strength. Once the basic structure is built, we wrap the shelf with a solid wood band that matches the room's design.

For example, we have used quarter sawn white oak in one project and vertical grain Douglas Fir in another. The key is to choose a wood that complements the room's existing materials. The great thing about this method is that we can control the exact thickness and finish to perfectly suit the space.
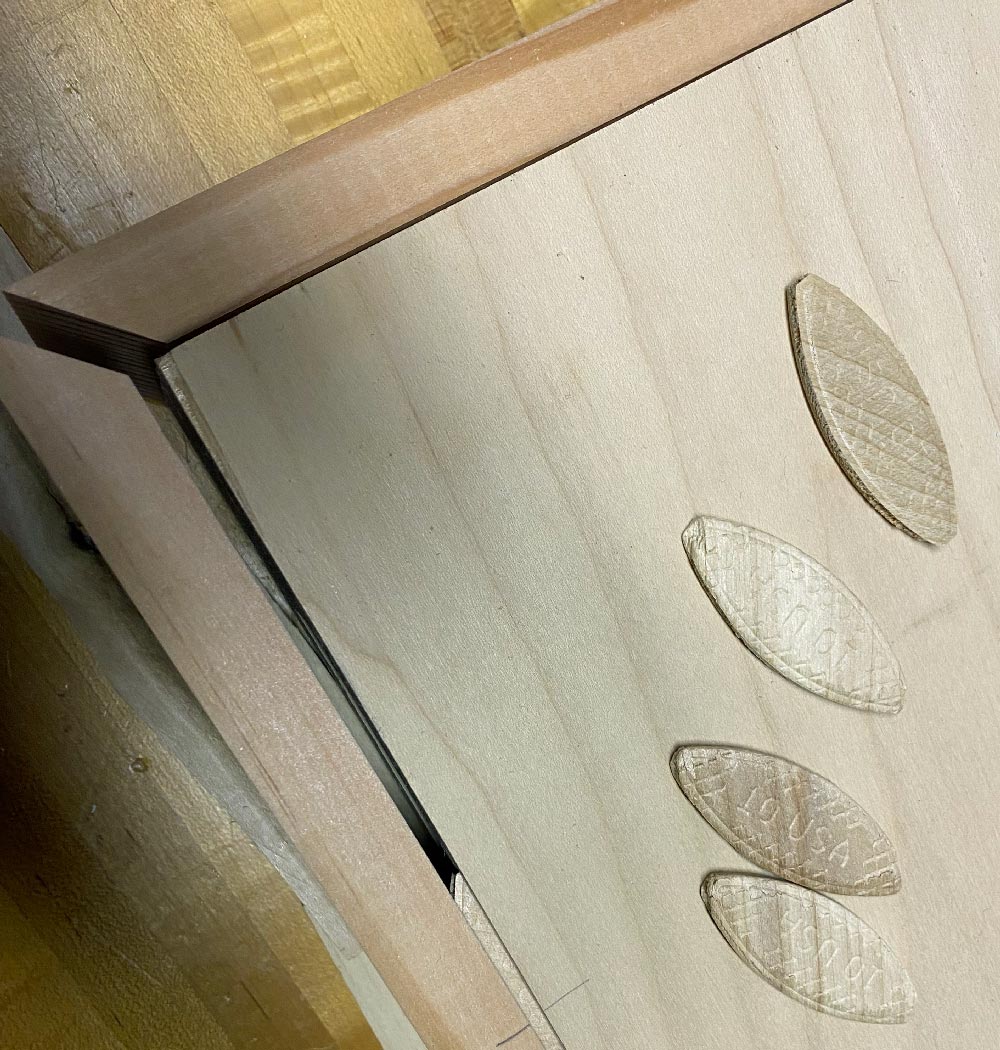
When it comes to the wood band, the joint type is important. For a traditional look, we often use a butt joint where the longer edge overlaps the shorter side. But when working with something like vertical grain Douglas Fir, a miter joint is the way to go, it keeps the lines clean and avoids any “visual turbulence” from the end grain. We prefer using a table saw for these cuts because it gives me the precision we need.
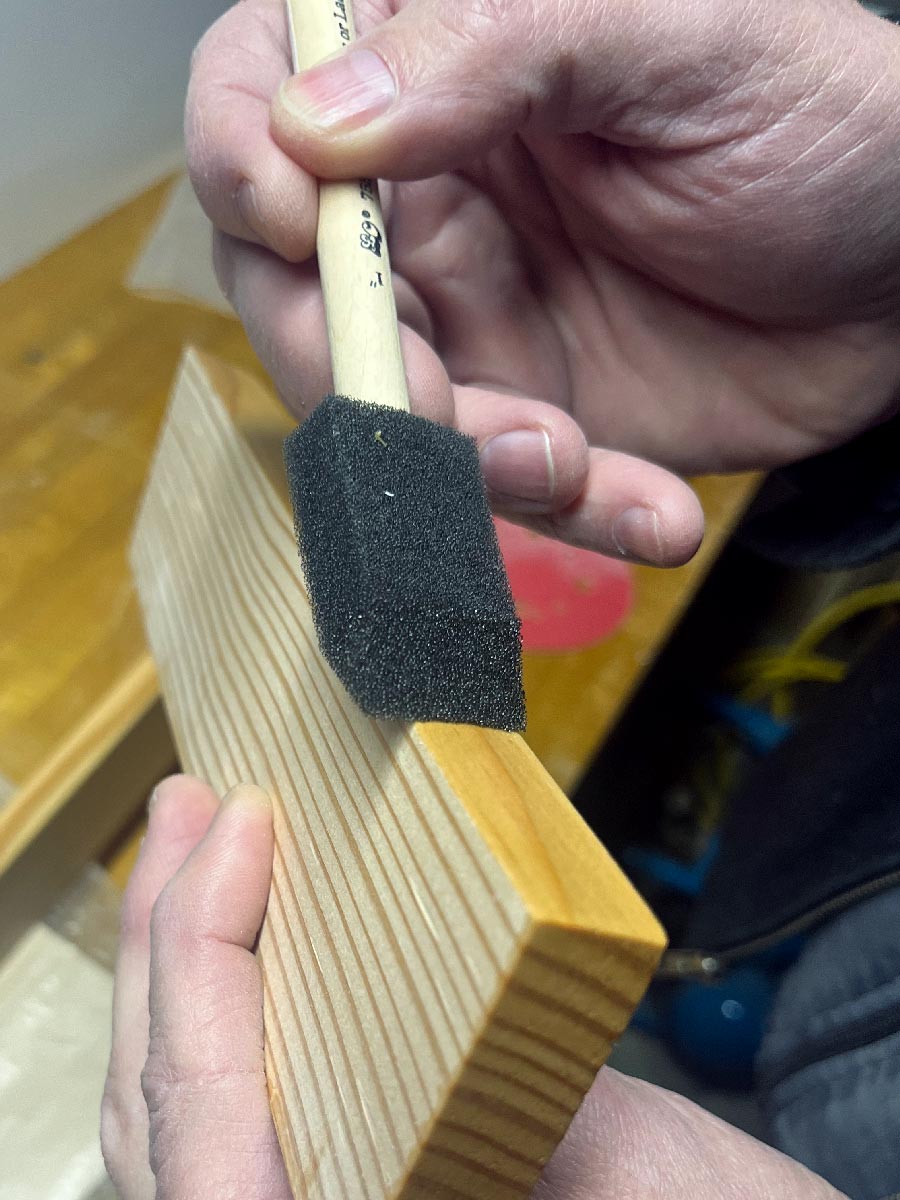
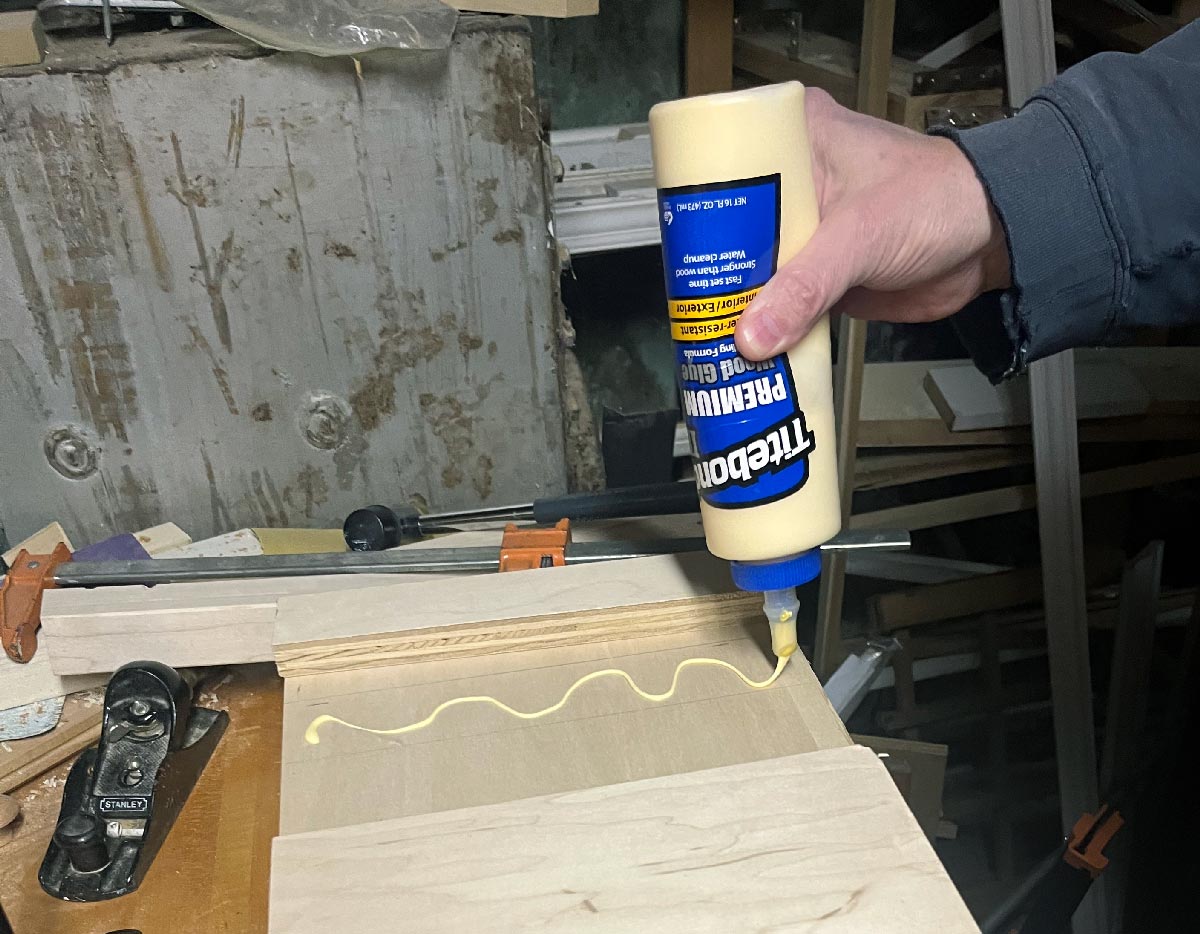
Before gluing, we always apply a finish to the wood edges to protect the surface and make any adjustments easier.
 |  |  |
Installing floating shelves can be a bit tricky, but with the right tools and techniques, it is straightforward. The first step is marking your level line on the wall, which ensures the shelf will be perfectly straight. Next, we use the bracket to measure the hole placement, making sure it lines up with the studs for maximum stability. |
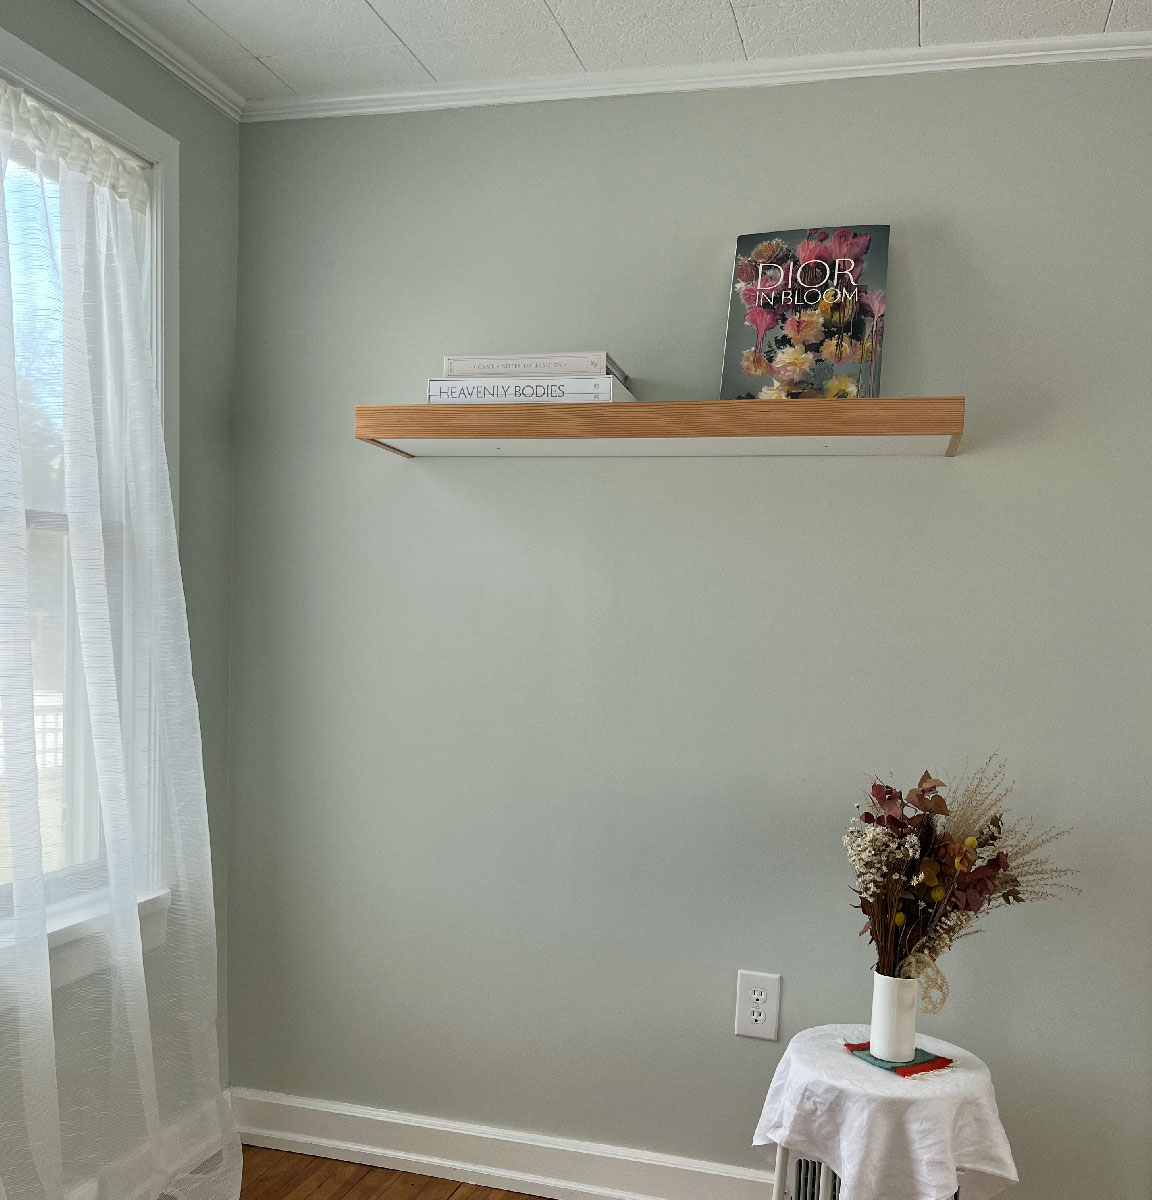
The End Result: A Beautiful Floating Shelf
When done right, a floating shelf is more than just a practical addition to a room; it's a statement piece. By paying attention to details like wood selection, bracket placement, and finish, you can create a shelf that complements and enhances the design of the room. The method we use, combining a painted skeleton structure with a natural wood band, gives you flexibility to match the style of your space, whether you are going for something modern, rustic, or something in between.
Building and installing floating shelves may sound complicated, but with patience and the right materials, anyone can create a stunning, functional display area. And once you see your finished project, you will agree that the effort is well worth it.
This Article May Also Interest You: Mushroom Barley Soup for the Coldest Days
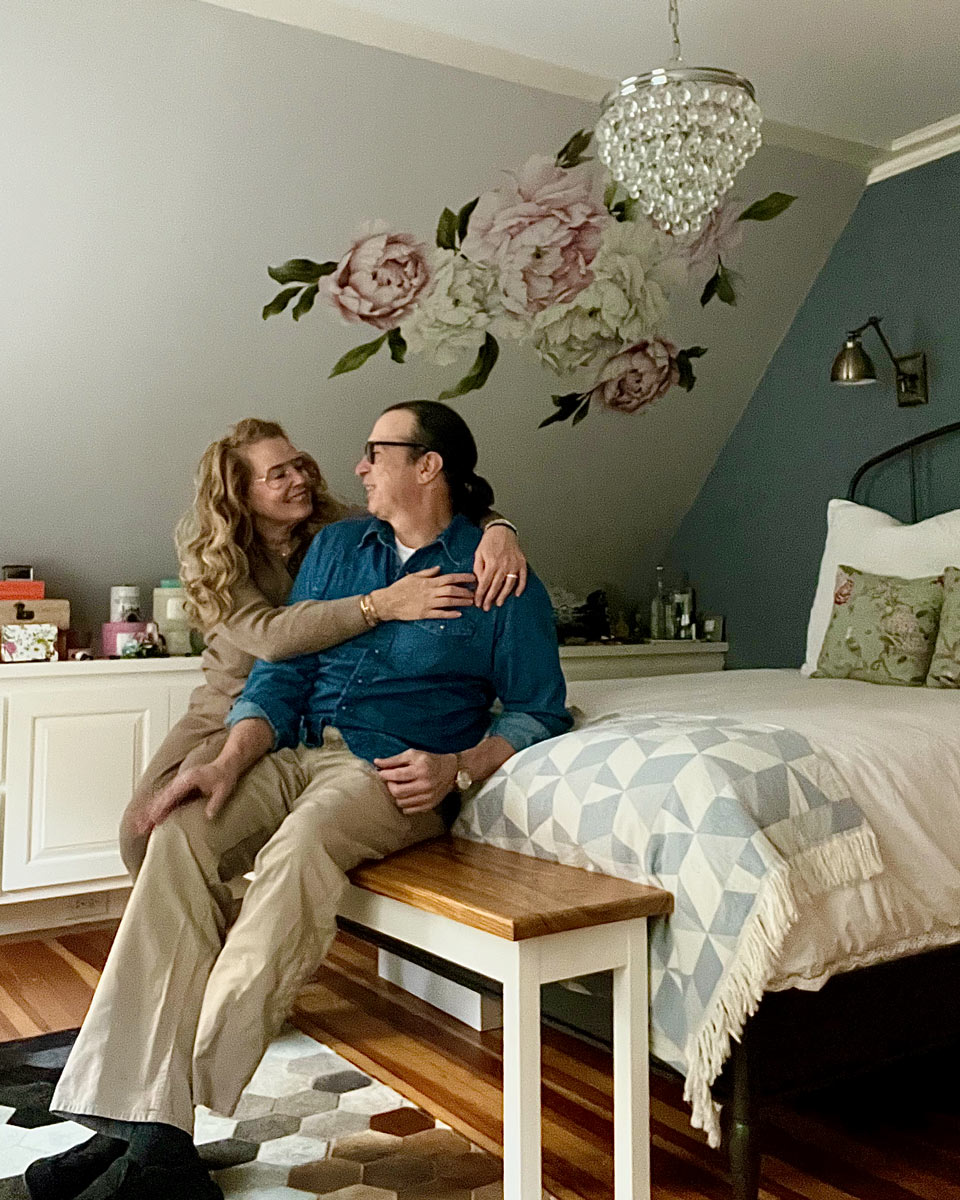
A Beautiful Custom Wooden Bench for the New Year
As the New Year brings a fresh start, it is the perfect time to add a special touch to our home. To kick off the new year, Tim created something truly special for me, a beautiful custom wooden bench for the bedroom that brings both function and style into the space.


The bench is crafted from canary wood, a stunning material with a rich, vibrant grain that stands out beautifully. It was chosen to co-ordinate with the spruce floors in the room. Tim took extra care in highlighting the wood’s natural beauty. The grain flows across the surface, making each angle of the bench a piece of art in itself.

To ensure durability and strength, the legs of the bench are made from solid maple. Maple is known for its resilience, and by choosing this wood, Tim ensured the bench would not only look incredible but also withstand the test of time. The legs were painted the custom white that perfectly matches the bedroom trim and the custom built-in features throughout the house. This cohesive color choice ties the bench into the overall design, seamlessly blending with the room’s existing aesthetic.

This bench serves as both a functional piece and a striking focal point in the bedroom, adding warmth and personality to the space. Whether used for extra seating or as a stylish spot to lay out clothes, it’s the perfect blend of craftsmanship, beauty, and practicality.
We are excited to have this new addition in the bedroom and cannot wait to see how it continues to enhance the space for years to come. It is the kind of thoughtful design that truly makes a home feel special and uniquely ours.
Wood Floor Discovery: Sometimes Best to Call in a Professional
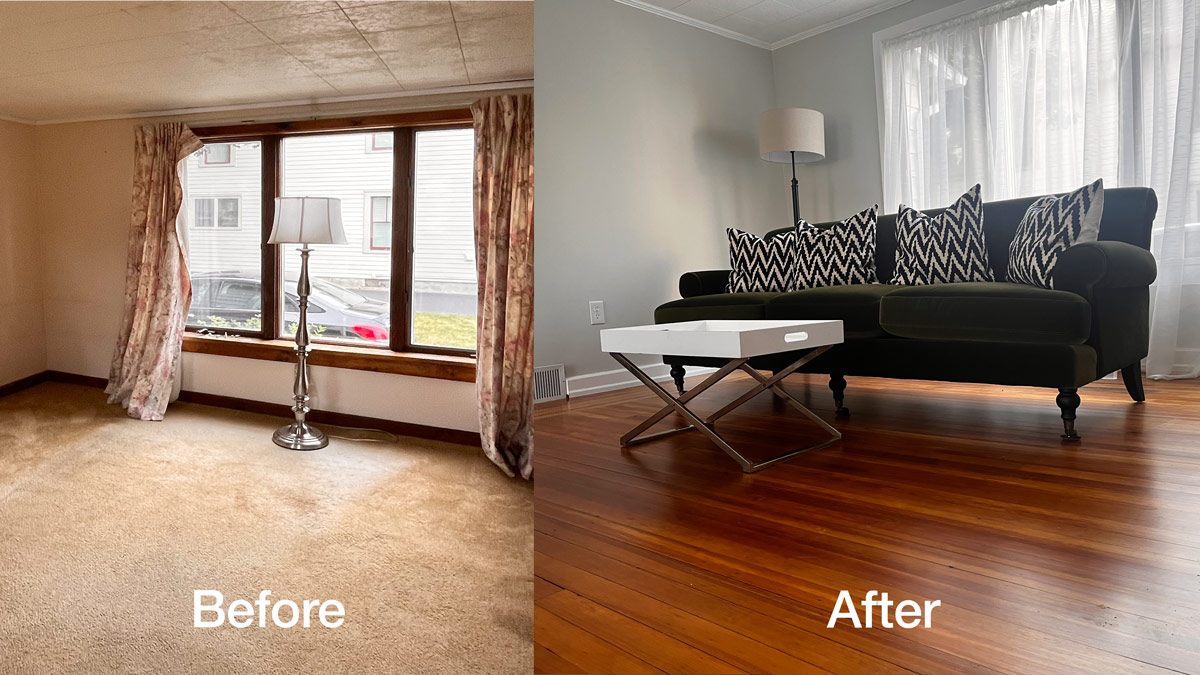
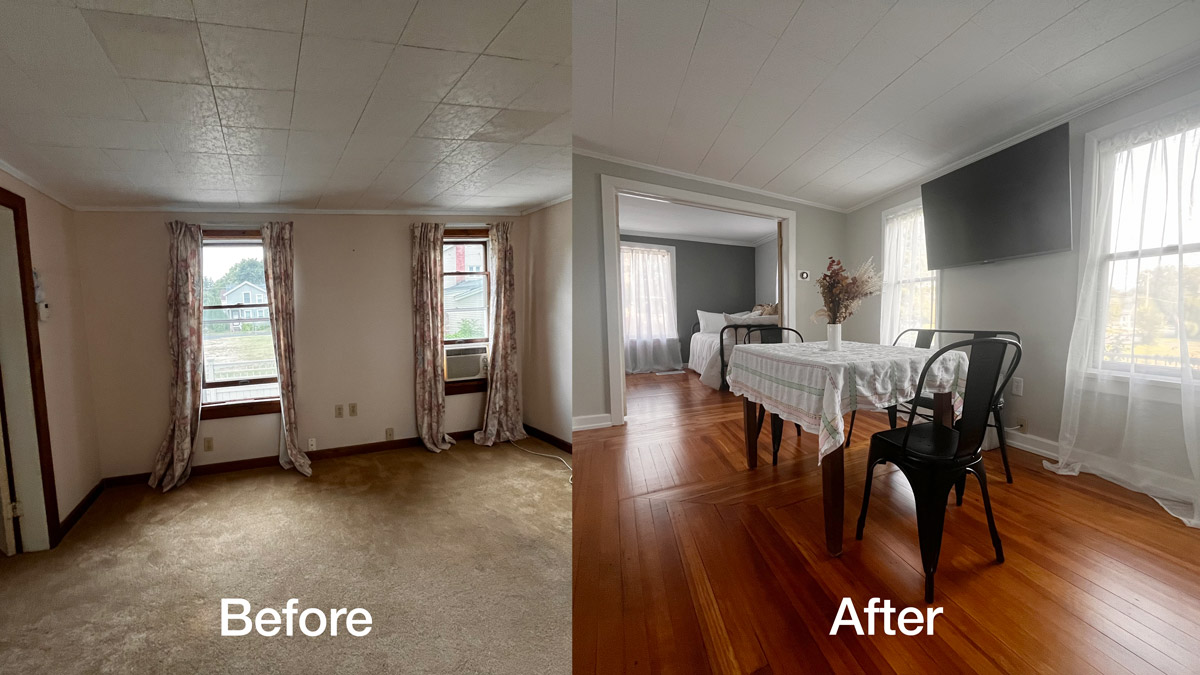
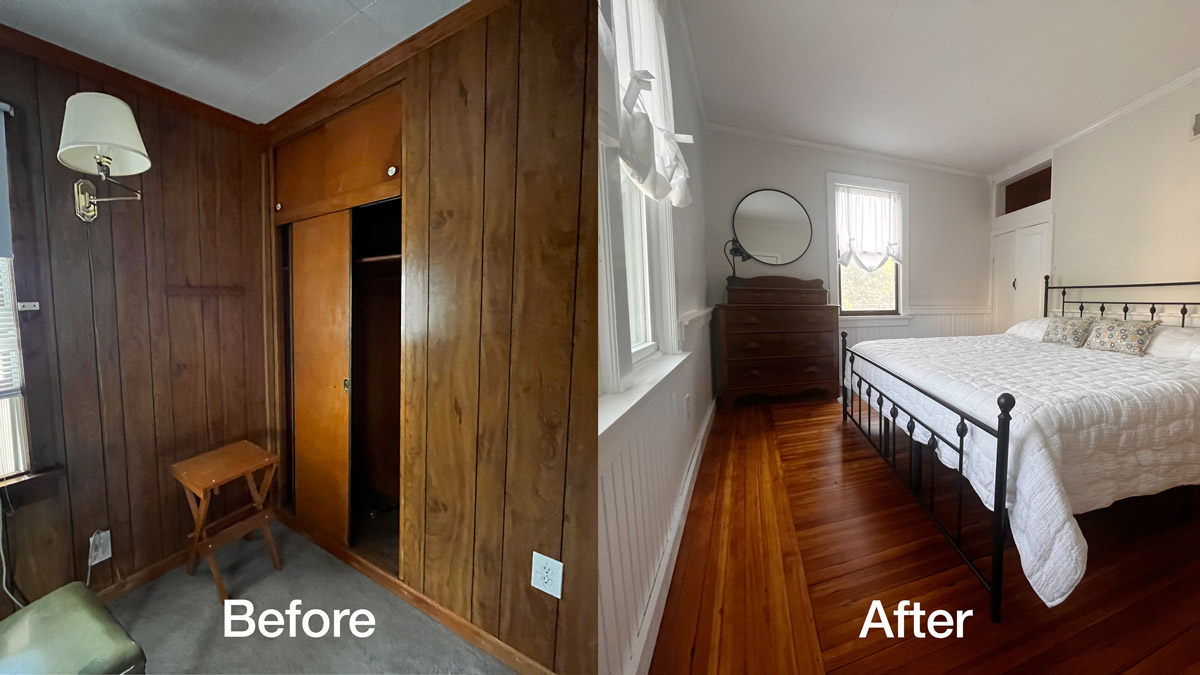
We are seven weeks into our renovation of Paul’s Cottage. We have had quite an adventure with our wood floors. Discovering the red spruce wood was a fantastic surprise, especially with the unique inlaid pattern that was discovered in the parlor, after removing the wall to wall carpeting.

We were so excited by the wood pattern and condition we decided to sand the parlor floor by hand with an electric sander. Sanding the floors was definitely a labor of love, but it turned out to be more challenging then we expected. The dust and the physical effort was overwhelming. This is when we realized we needed to call in a professional. Sometimes it is best to let the experts handle the job to ensure the best results, and to save our energy for other aspects of the renovation project.
This experience has given us an appreciation for the craftsmanship involved in working with old wood floors. Now that the floors are beautifully refinished it has set the foundation for our cottage.
This Article May Also Interest You: Two Years, and the Journey Continues

Paul’s Cottage
We have acquired a charming piece of history that we are calling Paul's Cottage, a quaint 1875 farmhouse. Nestled in the heart of the Saratoga Springs community and conveniently located adjacent to our current property, this sweet old house has captured our hearts.
Join us as we embark on an exciting journey through multiple phases of renovation. From restoring its historical features to adding modern comforts, we're diving headfirst into phase one. Stay tuned as we document every step of transforming Paul's Cottage. Follow along and be a part of our renovation project!
Built In Cabinets in Your Home
One of the biggest obstacles to building in a cabinet in an older house is often that the walls and floors are no longer plumb, level, and square. In some cases they were never that way. Additionally, some raw space in an old house with plaster and lath walls is dirty and very hard to completely clean out. Some hardware may also require a very strong level base to work effectively, such as full extension drawer glides.
Our solution has been to build plywood boxes that can be inserted, leveled, and trimmed into place. This allows us to create a clean, level, and plumb cabinet in an older home that is strong enough to mount any hardware you may use.
We begin with measurements of the space, with a note of how much adjustment will be required to level a square cabinet. Usually the base comes with 4 inches of adjustment from the floor. This area is to low to utilize and is a primary adjustment in an old, settled house.
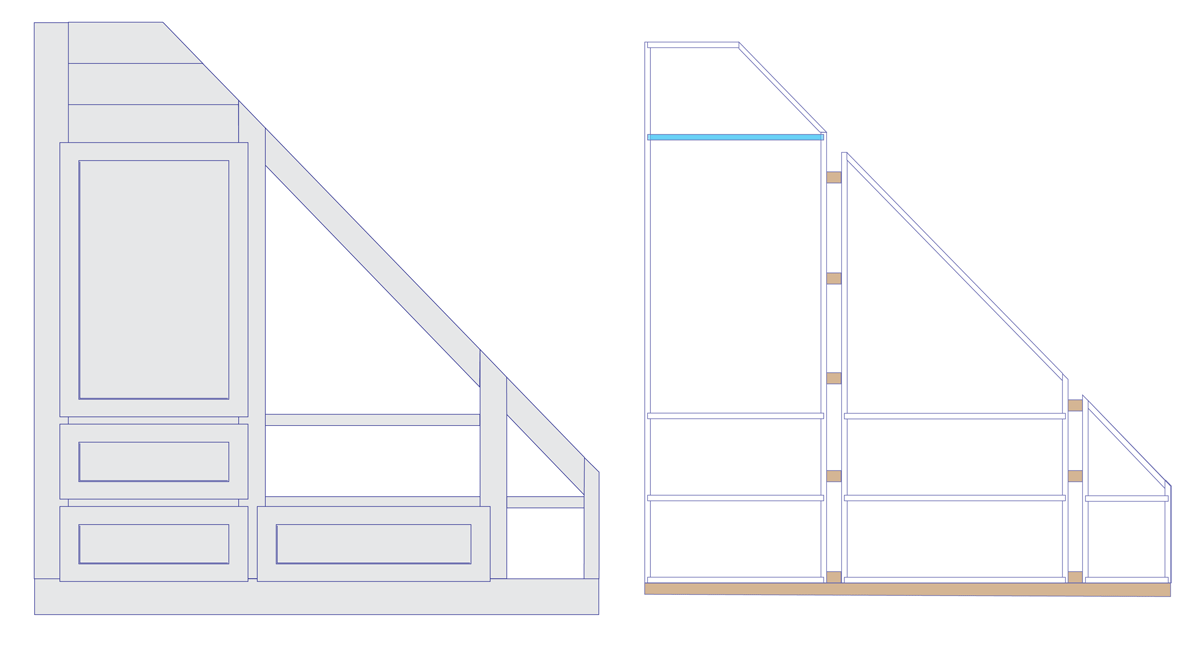
Once we have our measurements we begin with scale a drawing of our desired finish cabinet. From here we can plot out the amount of adjustment we will require and design the inner sections. These sections are then drawn and a cut list is developed complete with all measurements, dado, and rabbit cuts.
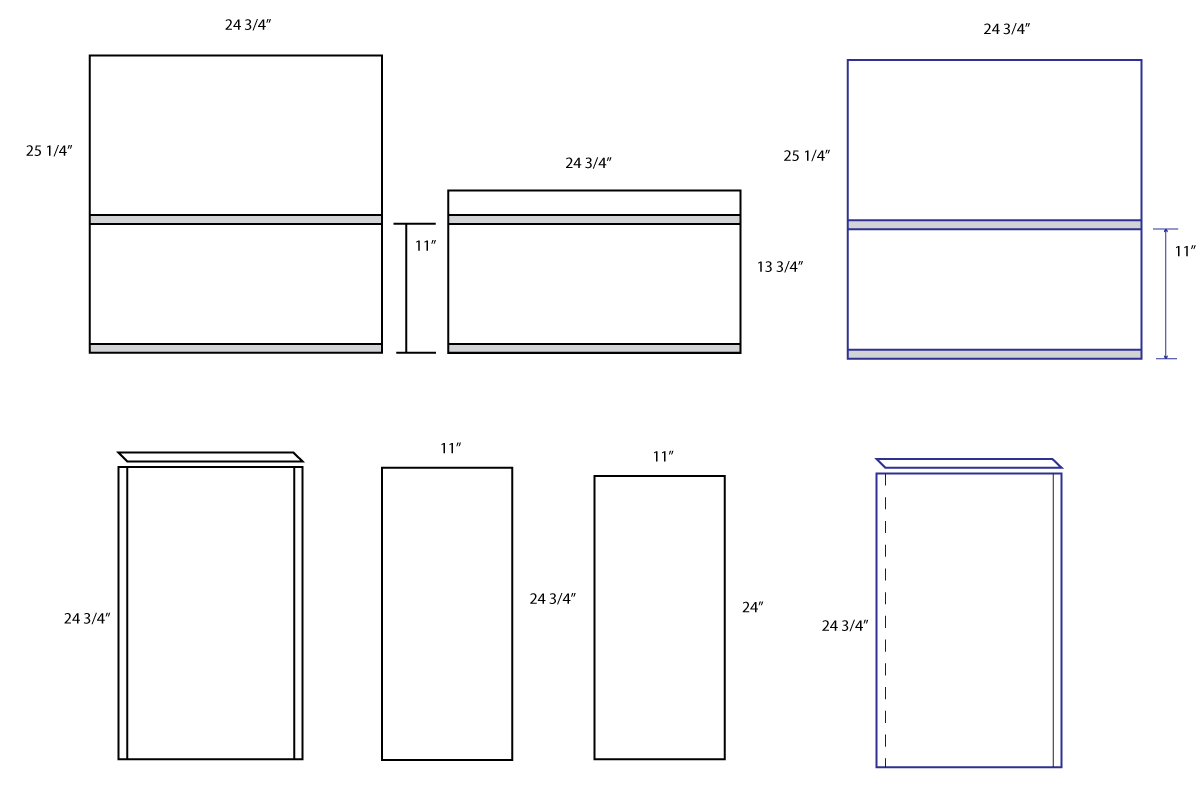
The pieces can then be cut and assembled. One additional advantage of our system is the ability to assemble the units in the area where they will be installed. In our house the doors are often narrow and shorter than you find newer homes, which makes it difficult to move larger items in and out.
| | |
You can often have your pieces cut for you at your local lumber yard, or hardware store. They will often have equipment that is designed to handle the large heavy sheets of plywood. |
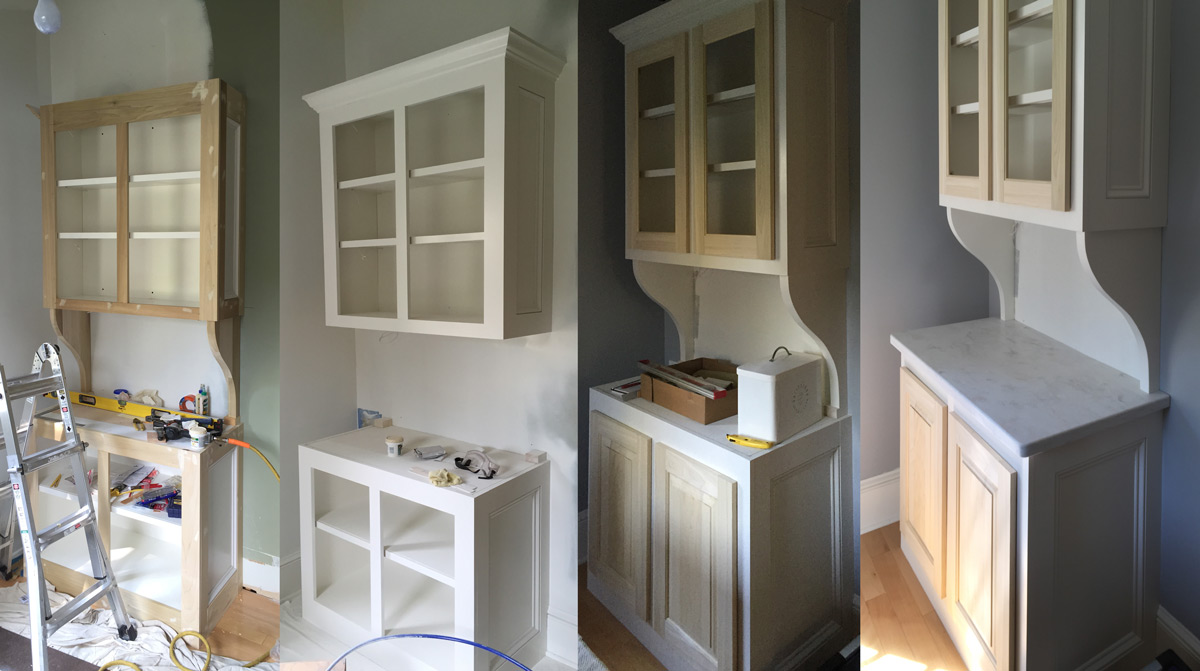
The final step is to trim the new shells. We typically use poplar stock for our home. It is vary consistent and is easily scribed to uneven walls. It also holds paint very well, and our house features painted trim. If your home features natural wood, we recommend matching the existing wood and attaching the face frames from inside the cabinet to avoid seeing the fasteners. This may require specific structure to allow the attachment from the inside.
This Article May Also Interest You: Mushroom Barley Soup for the Coldest Days
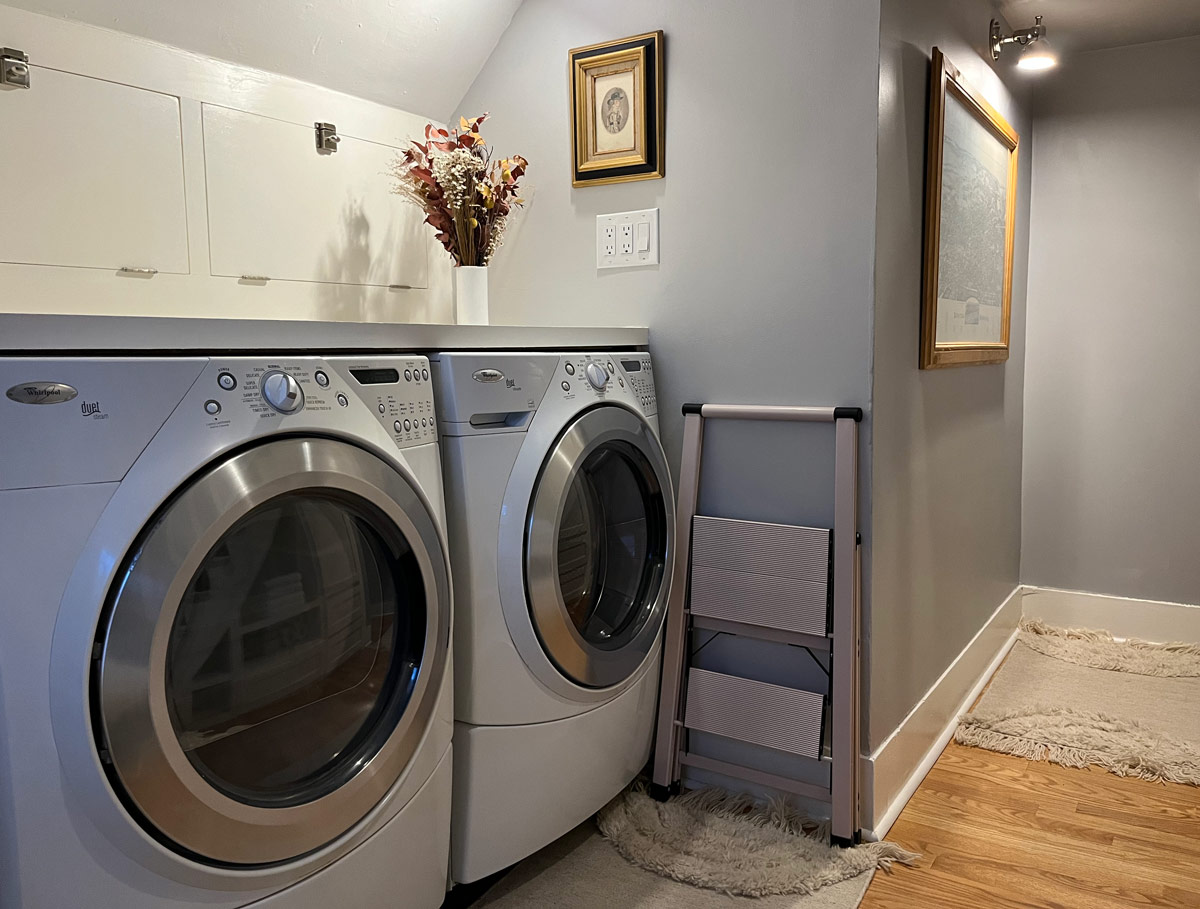
Converting a Hallway into a New Laundry Room
Our old house did not have a dedicated laundry room. Early on our laundry was in our first floor half bath/utility space. When we redesigned the kitchen, we moved the laundry upstairs to our largish back bathroom. This space was cleared for the washer by removing an old bathtub that was no longer functional. Next to this bathroom we had an unusual hall that leads to our third floor stairs. This corridor featured a large built in cabinet approximately three feet deep by seven feet long tucked under the roof line. This space would be re-designed to become a new dedicated laundry room.
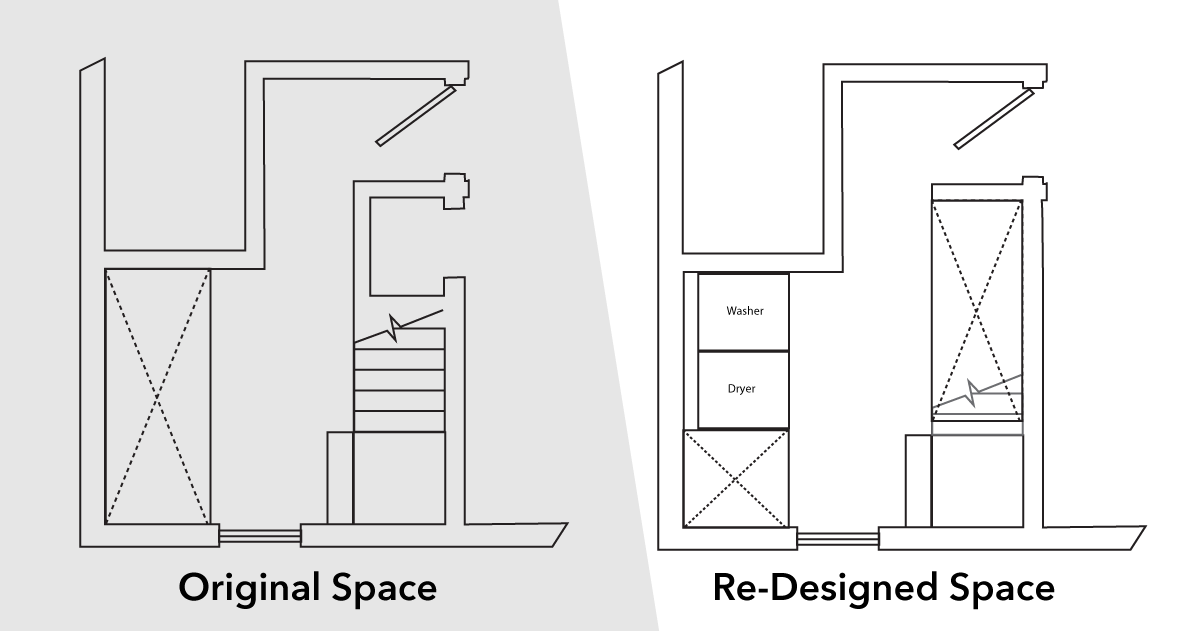
To begin we closed and patched the wall for a small closet that was in the bathroom. This allowed us to access the space from the other side giving us some much needed storage in our new space. As shown in the above plan the initial closet was small and used the available space poorly. Additionally, our future plan for the bathroom required the closure of the closet in that room.
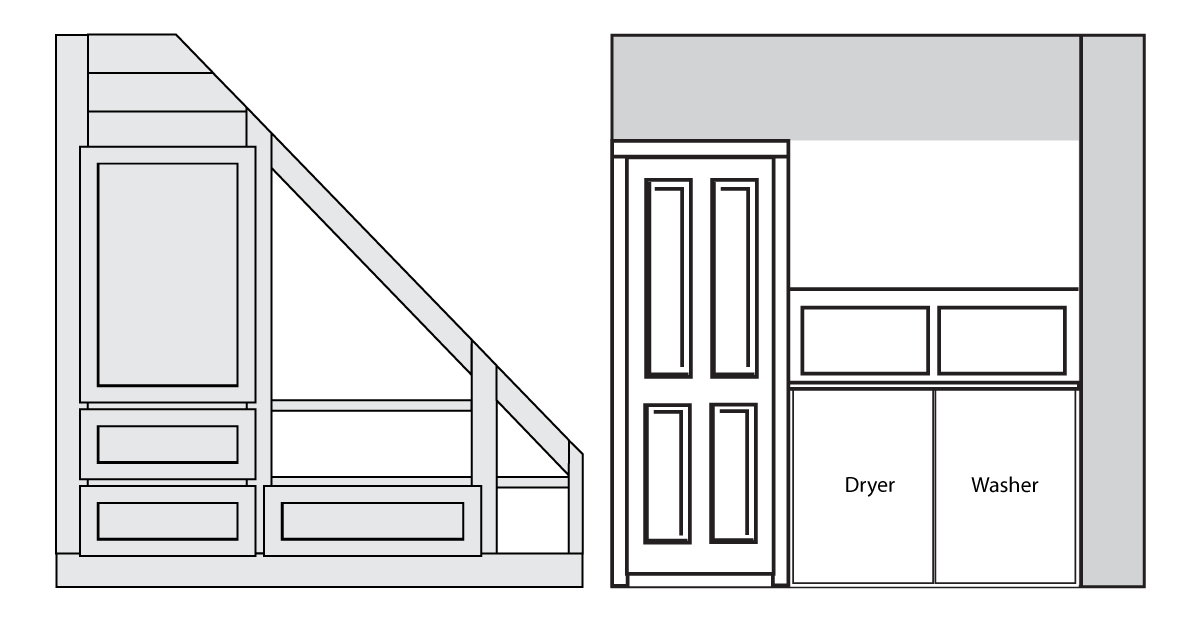
In the new laundry space we were able to utilize the entire space available under the staircase to the third floor. This gave us some much needed new storage space because we were going to lose space that the washer and dryer would require.
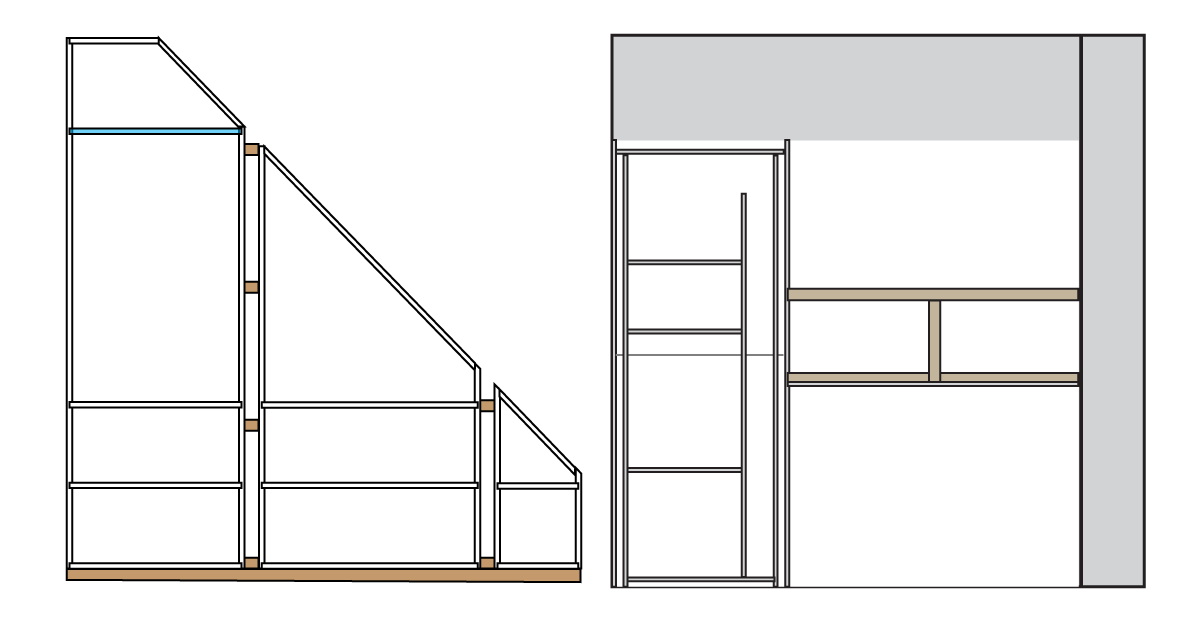
Across the space from our new storage was the builtin cabinet that would be reconfigured to give us room for our washer, dryer, and a new smaller closet.
To get started we demo’d the space to give us a clean look at what would have to be done to convert the space. Often in an older house, like our, you will find that some work will be required once the space is opened. Walls tend to be out of plumb, floors out of level, and some of the updates installed incorrectly.
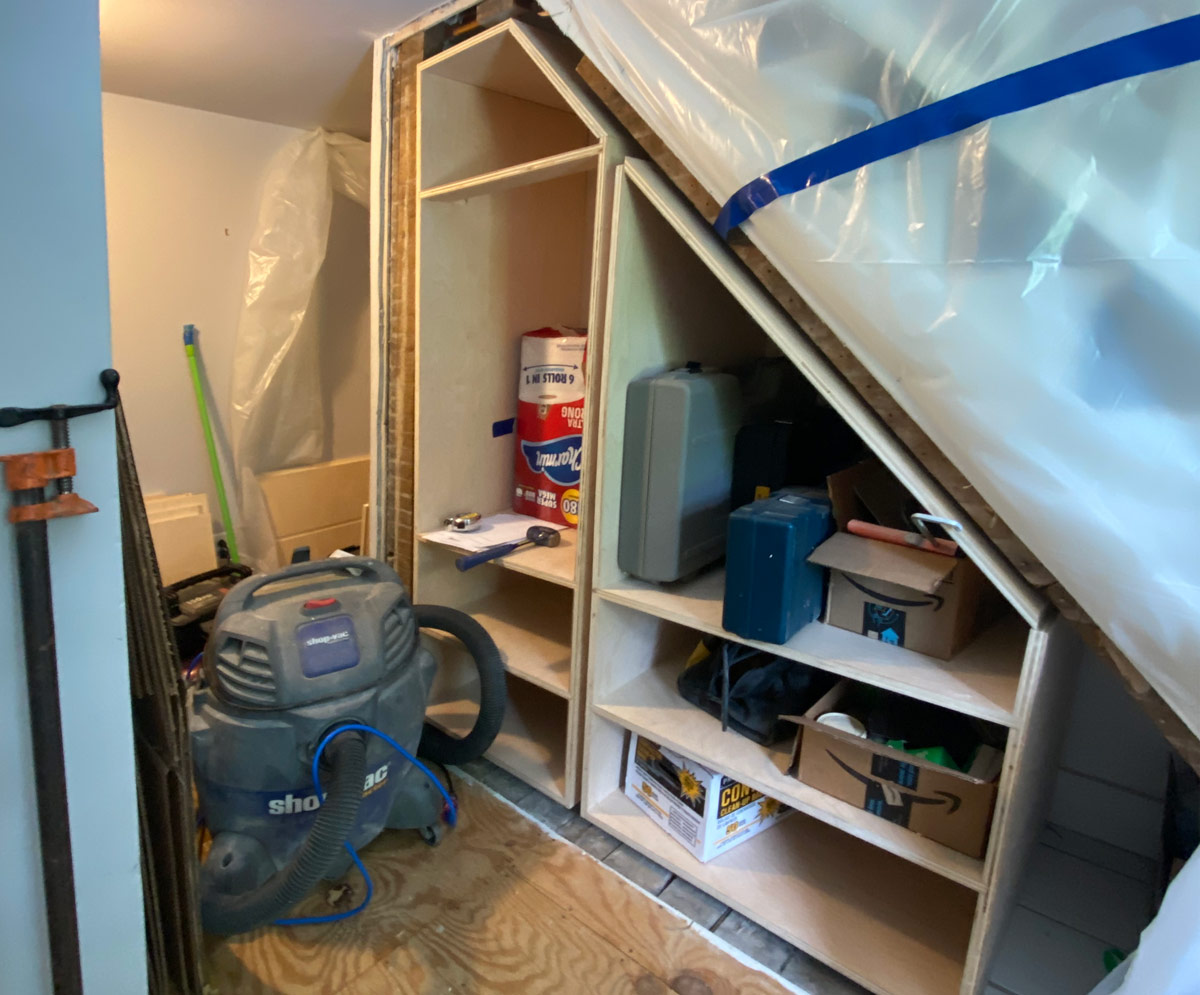
We were lucky that the area we were about to work in has been largely unchanged in the last 100 years. This would free us from having to fix any poorly installed electric or other elements. Taking down the old built in cabinet and the wall under the staircase was straight forward, and allowed us to get the final, exact, measurements of the raw space.
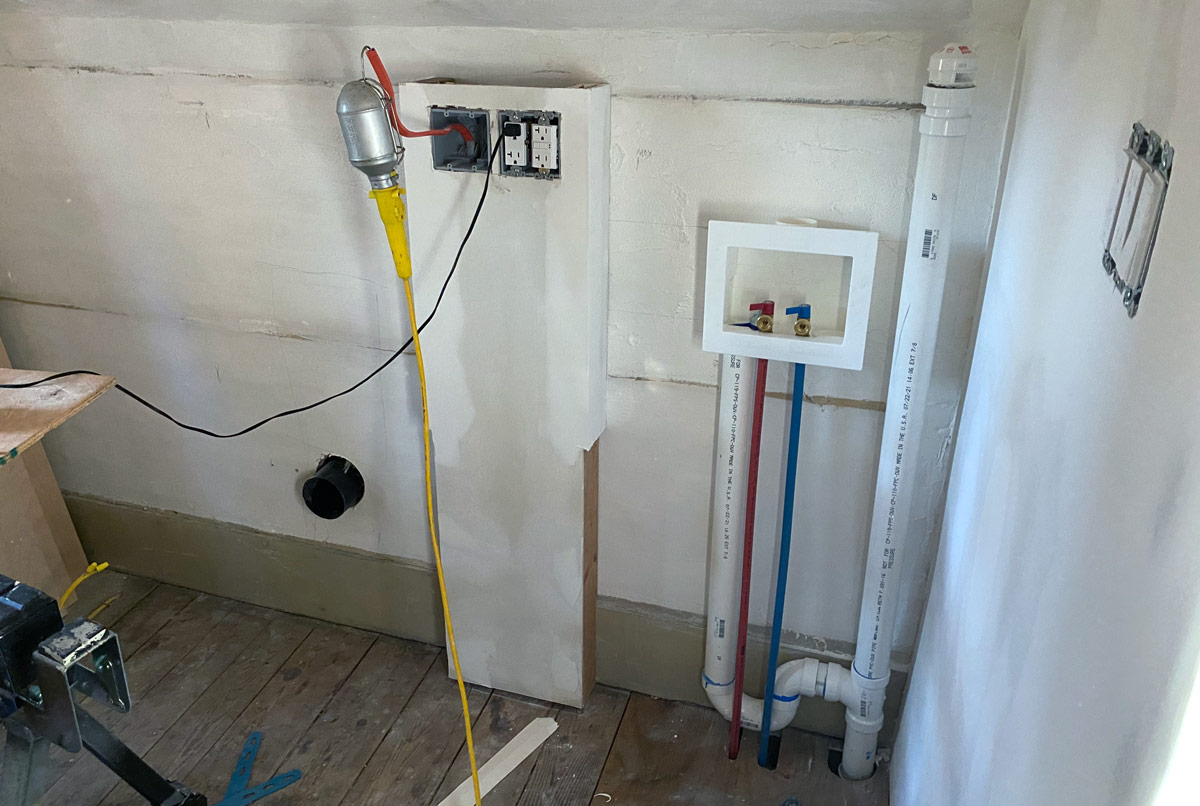
Our second action in the space was to have the plumbing and new electric installed. Previously we had installed the wire, hot, cold, and drain pipes in a first floor wall during a renovation of that room. We used local professionals to have this done. While this is not a complicated project, having the elements installed correctly in compliance with local codes is important to their function and safety.
Now that we had our plumbing and electric completed our work on the new cabinets would begin. We have developed a system that we have used very successfully to install builtin cabinets in our old house. This entails building self contained boxes that are installed, leveled, plumbed, and trimmed in place. This allows us to compensate for some of the problems that come up in a one hundred plus year old house. The shells are built slightly smaller than the space they will occupy and can thus be leveled, plumbed, and adjusted. Once they are trimmed and painted there is little evidence of the adjustments. See Built In Cabinets.
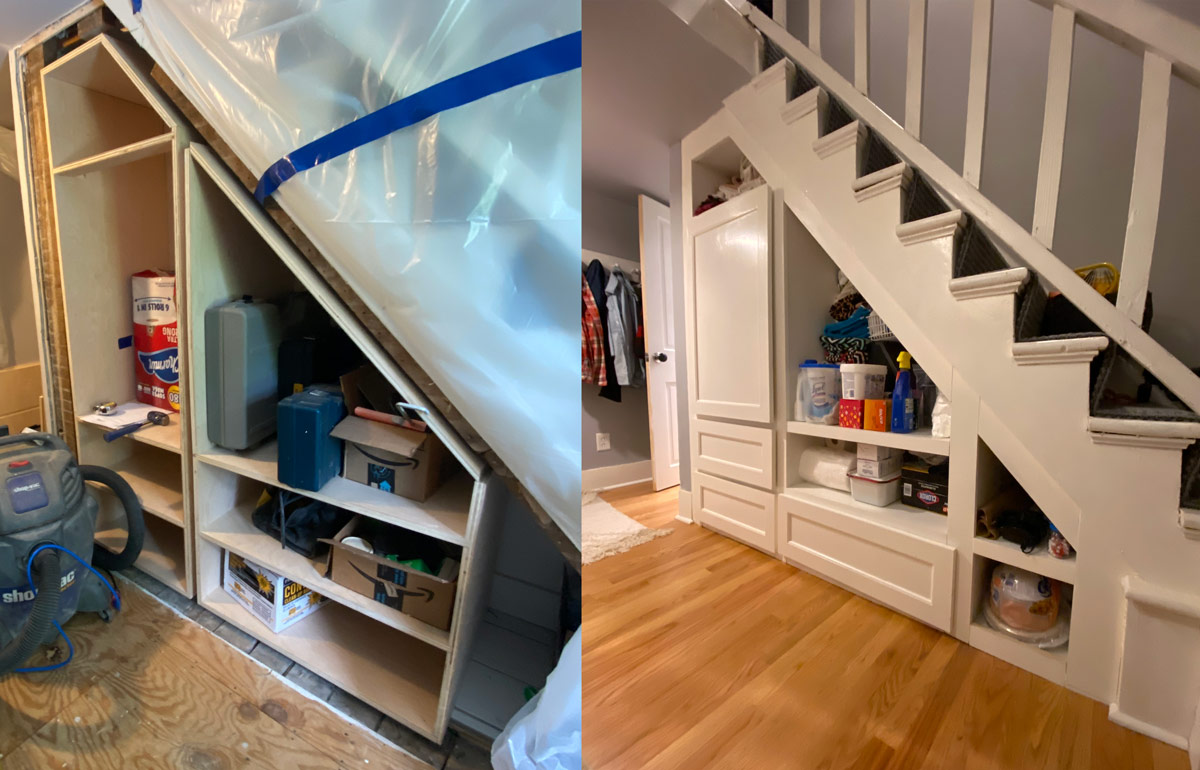
Given the unusual shapes, our design would be nothing if not interesting. The first cabinet would go under a staircase and follow the angle. We segmented the space into three section to maximize the amount of useful storage. With a combination of doors, drawers, and cubbies we were able to maximize the usable storage space under the staircase.
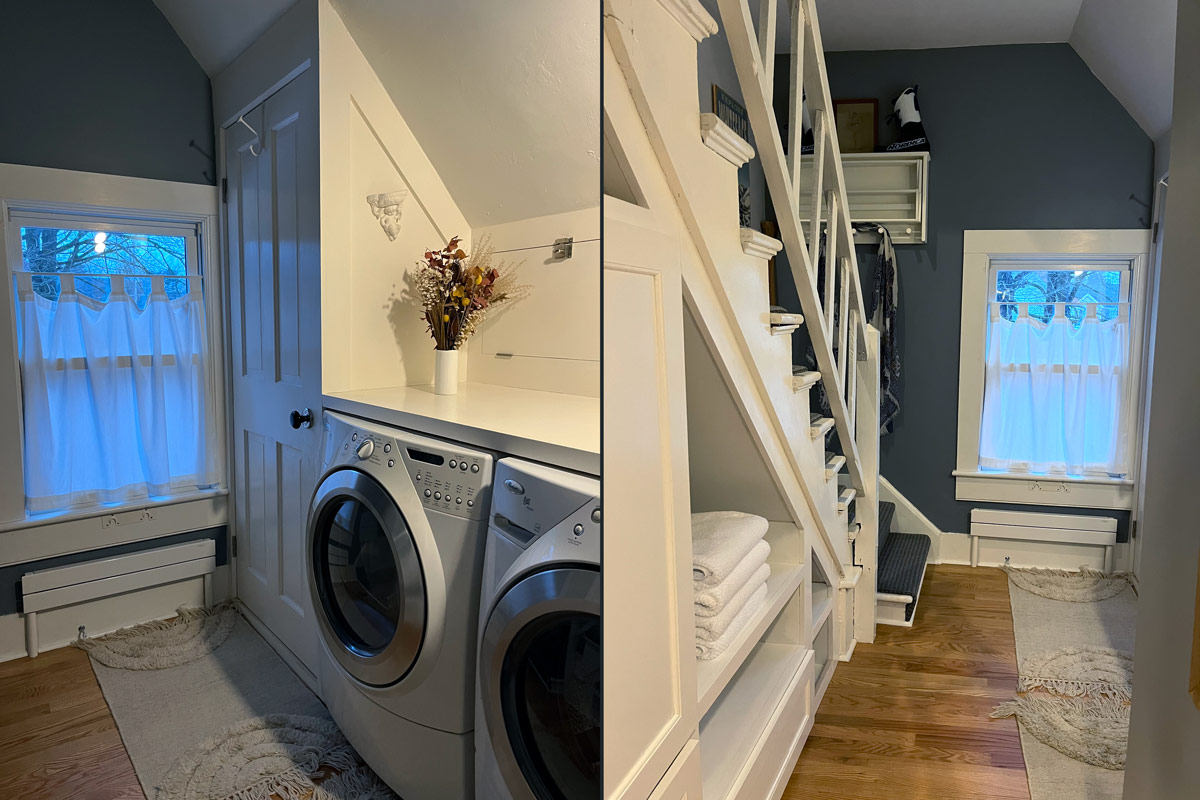
The primary work in this space went into the new laundry area. After removing the old cabinet we were able to fit the washing machine, dryer, and a new cabinet to recover some storage. In addition we added an inline filter to the dryer vent system to keep the system clean. The side cabinet is full height and has a full height section inside to store taller items like our ironing board, mops, and brooms. Over the washer/dryer we built a counter that attaches to the cabinet on one side and the wall on the other. The back of the counter is actually supported from the ceiling. We added a pair of doors to give access to the mechanicals behind the washer/dryer and used the frame of the doors to connect to the ceiling joists and add support to the counter.
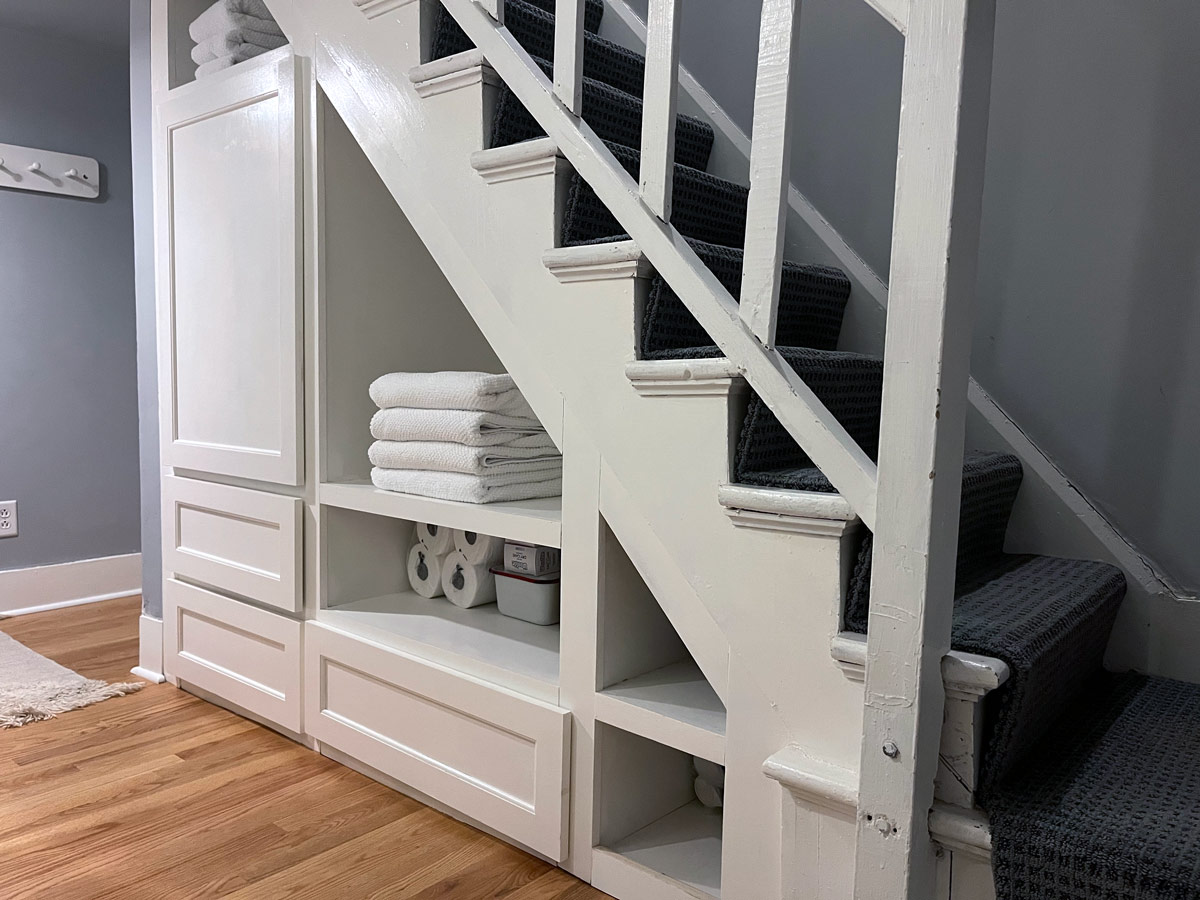
The final step in our new space was the addition of new hardwood floors. As in many renovations we have completed, this space seems like it was always here. The new function has clawed this room back into our house. Transforming the space from an ignored hallway into a vital addition to our daily activities.